Monday, February 27, 2012

Honey Mustard Roasted Potatoes

Secret Recipe Club 

It is time again for the monthly Secret Recipe Club.  I love participating in this group because I get to try recipes and visit blogs that I probably wouldn't get to otherwise.  My family loves it to because this forces me to try recipes that I maybe would try.

This month I was assigned to Veggie Whiz a vegetarian blog with tons of great recipes.  I couldn't have received this blog to research at a better time than now.  Lent started last week and I am always on the lookout for delicious dishes without meat in them.  I ended up choosing a side dish instead of a main dish to make for the Secret Recipe Club, but I have many other recipes marked to try very soon.

These honey mustard roasted potatoes are delicious!  Slightly sweet and tangy but not over bearing.  The potatoes seemed to absorb the flavors without losing that potato taste that my family loves.  I left out the lemon zest simply because I tossed the lemon out without thinking to zest it.  Mine didn't get as dark as the original recipe, but the flavor was great!


Honey Mustard Roasted Potatoes
Recipe Source: Veggie Whiz


1 1/2 pounds baby Potatoes
3 tablespoons Extra Virgin Olive Oil
1/2 cup Old style Dijon Mustard
1/3 cup Honey
2 tablespoons Parsley, finely chopped
1 teaspoon Lemon juice
1/2 teaspoon each Salt and Pepper
2 teaspoons Lemon zest


Preheat your oven to 425 F. 

Clean and cut potatoes in half or quarters depending on the size you have.

Place potatoes in a big bowl and toss with olive oil, salt and pepper. Arrange on baking sheet in a single layer and roast for 15 minutes. 

Combine mustard, honey, lemon juice and parsley in small bowl. Toss potatoes with honey-parsley mustard in large bowl until evenly coated. Arrange potatoes on baking sheet again and roast until potato edges begin to brown. Remove from oven and let cool a bit before garnishing with lemon zest.


Sunday, February 26, 2012

Life imitating Art imitating Life

Quote of the Day:  Oscar Wilde is noted as saying, Life imitates Art far more than Art imitates Life...the self-conscious aim of Life is to find expression, and that Art offers it certain beautiful forms through which it may realise that energy. source: Wikipedia.  I would argue that one influences the other, and that when one creates Art from Life, the response is a mirror to mirror image, ones that endlessly reflect the other.  Let me illustrate.

On Saturday, late in the afternoon, several of the cast members gathered at Coco Moon to rehearse. We ended up singing through the songs, just as the characters in Coffee Shop Confessions do. We sang. We discussed. We fussed about parts, who's singing what. We added in real life chatter. We got worked up, and we enjoyed ourselves to the fullest. We created a scene during business hours at the shop, and one of the workers came over and said, "You guys sound great."  Joey just happened to have her camera along, so she took a few photos.


A tense moment. Who's in charge? What are we doing?


Laura needs a piano. David comes through with a one-octave app on his Kindle Fire.


Note the mirror in the background.


Guy needed to write three drafts of his bio.
Joey told one crazy story after the other and told me to write it.
Isn't it great how we're all different!

I came home and thought, what happened at our rehearsal could be another scene in the play...or is it already there?

At the end of the week, this Friday and Saturday, we will perform to a packed coffee house! Holy smokes! Look what happens when you hear voices, see visions, and dream dreams. They really do come true...with a little help from your friends.

Go. Create. Inspire!

Journaling Prompt:  How have Life and Art been mirroring each other in your world?


Pasta con Ceci (Chick Peas, Sauce version)

I love keeping cooked beans in the freezer.  I keep them measured out in 2 and 4 cup bags ready to go at any time.  Use them for soups or a Pasta sauce, or just alone as a side dish.  They are so versatile and so good for you.  Why don't we eat them more often?
Ingredients:
2 cups cooked chickpeas
2 cloves of garlic chopped into small pieces
3 tablespoons olive oil
2 cups chopped tomatoes and their juice (You can dice them or put them in the blender first)
1/2 cup white wine
12oz of Rigatoni or tube Pasta shape that is wide enough so the sauce will get inside the pasta.
2 teaspoons of salt.
Optional/ basil/ parsley/rosemary/ whichever you prefer.

Method:
Serves 4
Heat your olive oil in a large enough pan to accommodate your ingredients at the end.  Add your garlic until fragrant.  Add your chickpeas and saute.  With the back of your spoon, smash a few of your chickpeas.  Keep mixing for about 5 minutes until your chickpeas are heated through.  Add your tomatoes, wine, 2 teaspoons of salt and bring to a simmer.  Set your lid ajar and let your sauce cook for about 15-20 minutes.  Your sauce is done when a ring forms around your sauce in your skillet.  Set your sauce aside to cool.   Cook your pasta and drain.   Toss in the skillet and serve. You don't need anything else.  It's very filling and satisfying all by itself.  Buon Appetito.


Pasta con Ceci


It's Monday night at the Giacometti's and I feel compelled to explain how this blog came about.   When exactly did Italian food get so complicated? When did it become about these huge portions of food?  My purpose is to  help expel those thoughts from your mind completely. Italian food is simple and delicious  in reality. It's is always about the fresh flavors of the ingredients.  Ingredients are never covered up.  They come together in a union to create something fantastic in the plate.  The Italians "Live for food."  Being Italian is not only about heritage, it's a lifestyle.
I felt compelled tonight to make something from the region of Tuscany.  A bean that is so often mis-understood here in the United States.  I keep Chick peas  (Garbanzo beans), frozen and cooked  in cup size portions ready to go in the freezer at anytime  If you are making these ahead, be sure  and rinse and leave them in water overnight.  They will need to boil for 3-4 hours and simmer in order to become tender.  Be sure that they are always covered in water while simmering.  Let them cool and place them in the freezer.  If you feel the need to use the canned variety that is fine.  There are many good varieties out there.  Be sure to drain and rinse.  Use them in the same fashion for this recipe.

Tonight's dinner is reflective of a reminder of Tuscany.  Ceci are typically served in a Minestra or soup with other vegetables. Typically hearty and served in winter.  Tonight, a Summer version,   Pasta with chickpeas with fresh Rosemary.   With Rosemary in abundance this time of year, this is the perfect quick and easy Pasta  to serve for a weekday dinner~ Buon Appetito~
Ingredients:
2 cups chick peas  (cooked and drained)
2 garlic gloves or 4 tablespoons of white onion
4 tablespoons of olive oil plus 1 tablespoon vegetable oil (addtionial olive oil to garnish).
3 tablespoons of fresh rosemary chopped fine for garnish
Optional pint of sweet 100's tomatoes or pomodorini
1 teasspoon of salt
1 teaspoon of pepper
Additonal salt and pepper for the table

Into a pan 2 tablespoons of olive oil, 2 sprigs of fresh Rosemary.  Remove your Rosemary as it is only to flavor the oil.   Saute your garlic until fragrant.  (You may remove it from the pan  or continue, as your oil will be flavored).   After just a few minutes place your 2 cups of drained chickpeas into your olive oil and mix.  Add your salt and pepper.  Keep your heat on med/ low and crush  some of your  cooked chickpeas with the back of a spoon.  Leave some whole as it is very pretty in a tubular pasta when served.  Cook for 7 minutes.  It is here that you might want to add your pomodorini  cut in half.  It is not necessary as the dish is flavorful without this addition, however I will add them on occasion when they are available out of my garden.    Place your lid on the pan and remove from heat.  Cook your pasta.  Rigatoni is recommended or any tubular shaped pasta.  Drain and mix with your chickpeas  and / or tomatoes.  Add additional olive oil.    Add fresh chopped rosemary for Garnish~ Buon Appetito!

Friday, February 24, 2012

Lemon-Lime Tarts with Semolina Shortbread Crust . . . Get Your Zing On!


Tarts. They're hard to resist. So cute. So small.

Even the pans they're baked in are adorable. Those scalloped edges. The way the little round bottom part of the pan lifts out, leaving you with a pretty ring of golden crust. Tart shells cry out to be filled with something really good. Something fresh and biting . . . something, well . . . tart. 

Lemons and limes must have been designed with tarts in mind. They supply such an unmistakable zzziing! 

And everyone needs to inject a bit of zing into their life now and again, don't you think?


About this recipe . . . 

This tart dough is made, in part, with semolina flour, which comes from durum wheat. It's more yellow in hue, and slightly more coarse in texture, than regular flour. Often used to make pasta, semolina reminds me of very finely ground corn meal. It makes for a firm tart shell that's pleasantly crumbly when you finally sink your teeth into it. Nice flavor, too. You can find it in small packages in most large grocery stores these days, and reliably in fancier markets (I used Bob's Red Mill brand). The dough recipe is a very simple one adapted from this Tastebook page, that I roughly converted from gram measurements.


The lemon-lime filling I adapted from Flour: Spectacular Recipes from Boston's Flour Bakery & Cafe, by Joanne Chang and Christie Matheson. Full of really satisfying recipes, the book is written in a friendly, matter of fact, let's-do-this-together tone. I'm a sucker for any competent cookbook author who manages not just to teach, but to reassure and embolden home bakers all in the same breath. If you want to feel intimidated don't buy this book. On the other hand, if you want to feel like you're in your kitchen working next to someone who understands that smart home baking should be an engaging and creative task, then you won't be disappointed in this delectable book.


Maybe you're wondering why I didn't top these tarts with meringue? That would have been so logical, right? Well, I almost did. Had my egg whites at the ready and everything. But then the Gods of Whipped Cream called out to me. From my refrigerator . . . 'cuz they live in there. Maybe meringue will win out next time. We'll see.


Lemon-Lime Tarts with Semolina Shortbread Crust
(For a printable version of these recipes, click here!)

Yield for tart dough: Enough to make at least 12 tart shells that are 3-4" in diameter (I used only about half of the dough, made seven tarts, and froze the rest for future use.)

Yield for tart filling: Enough to fill about 7 to 8 tart shells.

To make the tart shells:

Ingredients--
3 sticks and 1 Tbsp. unsalted butter, softened (that's 1 and 1/2 cups, plus 1 Tbsp.)
3/4 cup granulated sugar
2 and 2/3 cups unbleached all-purpose flour
2/3 cup cornstarch
1/3 cup and 1 Tbsp. semolina flour
1 and 1/2 tsp. coarse kosher salt

Preheat your oven to 325 degrees. In the large bowl of your mixer, on medium speed, cream together the butter and sugar for two or three minutes, until it looks light and fluffy.

In a separate bowl, whisk together the all-purpose flour, cornstarch, semolina flour, and salt.  With your mixer on low speed, pour this into the butter mixture in two additions. Stop to scrape the bowl and beaters between additions. Beat just until obviously blended. Don't over-mix.

If you're using tart pans that are 3" to 4" in diameter, put a glob of dough about the size of a large walnut into each one. Press with your fingers so the dough is evenly spread on the bottom and all the way up the sides of each tart pan. Be sure to gently nudge the dough closely into the scallops so the design will be firmly impressed into the shells when they're unmolded after baking. Use a fork to prick the bottom of the shells; this will help keep them from puffing up while baking. (Also, I recommend placing pie weights in muffin papers set in each tart pan over the dough. That's the best insurance to help them keep their shape as they bake.)

Place all the filled tart pans on a baking sheet with sides. Bake on the middle rack of your oven for approximately 20 to 25 minutes, or until lightly golden. When the shells are done baking, place them on a cooling rack for a few minutes before removing them from the pans to cool completely before filling them.

To make the lemon-lime filling:

Ingredients--
1/2 cup plus 2 Tbsp. granulated sugar
3 Tbsp. cornstarch
1/8 tsp. kosher salt
1/2 cup plus 2 Tbsp. water
1 Tbsp. heavy cream
yolks from 3 large eggs (You can freeze those leftover whites. I do it all the time.)
1/2 cup fresh-squeezed lemon juice (strained to remove seeds and pulp)
2 Tbsp. fresh-squeezed lime juice (strained to remove seeds and pulp)
1 Tbsp. butter, softened
1/2 tsp. vanilla extract

In a medium size saucepan, whisk the sugar, cornstarch, salt, water, and heavy cream. Cook the mixture over medium-high heat until it starts to thicken up and looks translucent (you'll know it when you see it).

While the sugar is cooking, in a medium size heat-proof bowl, whisk the egg yolks, lemon juice, and lime juice together. After the sugar mixture on the stove has thickened, as noted above, pour it slowly into the bowl of yolks and juice, whisking all the while (you don't want the hot sugar to cook the eggs, so just keep on whisking). When it's all mixed in, pour it all back into the saucepan and return that to the stove. Over medium heat, cook for 3 to 4 minutes, stirring continually the entire time, now with a wooden spoon (the mixture's going to get super hot, thus it's better to do this with a wooden spoon), until it thickens. Take the pan off the heat and immediately stir in the butter and vanilla.

Scoop or spoon the hot filling evenly into the baked, cooled tart shells. Let the filling cool down somewhat before you refrigerate the filled tarts. When the tarts are cold, top them with sweetened whipped cream (toss a few tablespoons of sifted confectioners' sugar in when whipping the cream) before serving, if you like, and garnish each one with little wedges of lemon and lime, or perhaps a few raspberries or a nice big blackberry or strawberry.


(If you'd like to comment on this post, or to read any existing comments, please click on the purple COMMENTS below!)

Thursday, February 23, 2012

Strozza Preti con Gamberi, Zucchine e Scalogno Dorata ( Pasta with Shrimp, Zucchini, and golden Scallions

 I came across these interesting, Organic, Italian Zucchini at the Whole foods Market in Birmingham, Alabama.  I was intrigued, since they were so tiny compared to their American counterpart.   I refuse to buy zucchini in Winter. They just breakdown into a pool of water when cooked.  Not worth the effort nor the price.  Sometimes you just have to step out of your comfort zone and give it a try.  I bought three.  They were under a pound in total.   How far can this go?  Pretty far in a pasta dish.  What a nice surprise.  A quick saute with garlic and scallions and the zucchini surprisingly held together.   What a surprise to taste such great flavor.   This "Strozza Preti" pasta is the perfect choice for this dish. (The Pasta term translates to "Strangled Priests, due to their twisted collar shape).  The Condimento coats the outside of this pasta so well while the remaining olive oil seeps into the pasta itself creating great flavor.  I just had to have a little extra.  I hope you like it.  Buon Appetito!
Ingredients:  4 people
12 oz of Pasta / Strozza Pretti/ Fussili/ Cavatappi/ or Small Penne
3 tablespoons of olive oil
2 cloves of garlic diced (about a teaspoon)
2 scallions trimmed and diced into tiny pieces
3 small zucchini (about a pound) Julianne (sliced long and thin with a sharp knife).
3/4 pound of raw shrimp/ or cooked shrimp.
(you will have to either saute the shrimp in the same pan or add your cooked shrimp at the end of your recipe). 
One teaspoon of salt 
One teaspoon of pepper
a few red pepper flakes
1/3 cup chopped fine fresh Parsley 
One tablespoon of salt for your pasta water. 
Additional Olive oil to drizzle over your pasta if you like
Method:
Place a large enough skillet on the stove top and heat (large enough to accommodate your pasta at the end).  Put your water on to boil for your pasta. Don't forget to put salt in the water!  (If you are using raw shrimp, place your Shrimp in your hot pan with one tablespoon olive oil  and quickly saute until pink. Add 1/3 cup white wine and let evaporate.  Remove them from the pan and set aside.  Wipe out your pan to re use.  Do not wash).   Turn your heat to medium and add your olive oil.  saute your garlic and scallions.  Add your zucchini, a teaspoon of salt  and cook until wilted, slightly golden and fragrant (About 4-6 minutes).  Turn your heat off and  place your cooked shrimp in your pan and give it a mix.( There is no need to add wine if you are using shrimp already cooked). Add your black and red pepper.  Set aside to cool. 

Cook your pasta in salted water and drain.  Toss with fresh, chopped parsley and serve.  Buon Appetito


Optional:  For additional color and flavor, add a tablespoon of tomato paste to your scallions and garlic when fragrant and mix in the skillet for just a minute.   Add your zucchini to the pan and cook as directed above.  This will give this dish additional color and flavor. 

Wednesday, February 22, 2012

Rehearsing "Confessions" at the Coco Moon

Quote of the Day:  You're building community. words from friends as they offer support and encouragement for my play

Rehearsing a moment with Roxy and the Moxie Mamas

Remember how that Self-doubt Committee had planned a meeting in my head? Then, I told them to meet some other place. I needed a little help from my friends to make them shut up, and here they are rehearsing my play right there at the Coco Moon just as I'd imagined it would be, and so much more.

Laura describing a kiss.

Some of our scenes are funny. Others are tender, and still more bring out fear and anger. This is a phenomenal cast. They have been enjoying the script through every rehearsal and care about how it's presented. We've been rehearsing at the Senior Center, because it's free, and we will pay them back by performing for their dinner on April 9, a Monday, open to the public.  It's another opportunity to see the play as all the tickets are sold out for the two shows we're doing next week at the Coco Moon.

Subtle eavesdropping on Jewell's conversation

"Mary" getting a call from home

Lolly & Sam giving Micki encouragement

Laura telling Jewell to sing the lead

Nick making a connection with the Moxie Mamas

I've been dreaming about being on a creative team. While I was writing this play, I sat in this coffee shop, surrounded by creative spirit. Then, I invited in the actors and the support people. The energy grew, and now, look at us. We're providing a unique experience for the folks in the Brainerd area, and I am so grateful for the people who joined this team, and the ones who are willing to take a risk on something new.

Go. Create. Inspire!

Journaling Prompt:  Look around you. What is one new thing you could do in your community to draw people in and inspire them?


Monday, February 20, 2012

Pasta con Asparagi, Gamberi e Arugula~ (Spaghetti with Asparagus, Shrimp and Arugula)

I am so happy to see so much excitement over this recipe.  I had a little fresh Arugula from my garden that would not be enough for a salad.  Why not toss it into some Pasta?  When Arugula nears the end of it's growing season, it's so incredibly spicy.  It's the perfect addition to this dish.  Had some fresh, frozen Pacific shrimp ready to go.  Pasta is always on hand.  Had just enough Asparagus left to make this dish~ What a great combination of texture and flavor.  You can use a shell type Pasta too as it would make for a terrific presentation.  I am a huge Spaghetti fan.  Can you tell?

Ingredients: For 4 people
1/2  pound of medium shrimp, cleaned, deviened, tails cut off.
2 cloves of garlic diced
12 oz spaghetti imported from Italy.  I use DeCecco
3 tablespoons olive oil
2 tablespoons butter
1 cup of white wine
1 teaspoon salt
1 teaspoon black pepper
1 handful (about 3 oz) of Arugula, washed and cut

Method:  Dice your garlic and set aside. Trim the woodsy bottom off your asparagus tips.  About 2 inches off the bottom. Blanch your asparagus in water with salt for 3-4 minutes.  Add a pinch of baking soda to help retain your green color of your asparagus.  Cut up, and set aside.  Into a heated pan add your olive oil, garlic.  Saute until fragrant.  Add your shrimp and a teaspoon of salt to the pan.   Cook for 2 minutes on each side until your shrimp turn pink and are almost cooked through.  I used  medium/Large shrimp here.  Add your white wine and turn up your heat.  Add your butter to your pan and let reduce.  In just a short 3-4 minutes add your cut up asparagus.   Add additional Salt and pepper to taste.  Set your sauce aside to cool slightly. A lovely sauce will be left in the pan.  In a Pasta pot filled with boiling water, add your pasta.  Cook, until al dente.  Drain and  add to your pan.  Mix with your Fresh Arugula.  If you don't have Arugula, Baby spinach or chicory will do nicely.  Enjoy and Buon Appetito~

Special Hint:  You can substitute Sea Scallops for your Shrimp.  They will require a longer cooking time but just by a few minutes. 
They can be quite large and substantial so you might want to cook less pasta to serve ~

Saturday, February 18, 2012

Youth Frontiers inspire Courage

Quote of the Day:  To have courage means to follow your heart. Brian, a presenter from Youth Frontiers at the Courage Retreat for the Forestview 6th graders.

I wish I had some photos of the retreat, but I don't. Their teacher, Mr. Wallace, took a bunch, but I'm not sure if they're for public, especially internet, use. So, I'll use my best writing skills to describe the day, and provide you with a photo of my guys who inspire me everyday to be the best person I can be.

Shaved heads to swim faster for sections and state.
Tootin' your own horn.
Feeling joy and love of being your authentic self.

I'm one of those moms who loves to volunteer for school, especially fieldtrips. I'll be the first to raise my hand and sign up for anything that has to do with the arts, but I've gone on other types of events, too. I hope the 8th grade teachers will let me chaperone when they go to the theatre for The Diary of Anne Frank (hint, hint). I've been to camps and picnics and overnighters at retreat centers. I told the boys that I'd signed up for this one-day event because they needed small group leaders, and I've been a small group leader for... "ever," they both said.

This is a high energy experience for both the kids and adults. I wished I had worn a t-shirt and gym shoes. They encouraged us to participate to the fullest, be the first group to run across the large group circle, jump and dance, stand up, sit down, you get the picture. It was an aerobic day. I had visions of sitting in a small circle with my 5 or 6 kids and visiting. We did that, too. But, the large group, energetic time was to help us all relax, laugh, move and have fun together, so that when we got into those smaller groups, we'd be more open to sharing our fears and hopes for building a better community.

The presenters are high energy, caring leaders who readily share their own stories of when they were feeling left out, or could have made a better decision to include or help others. They have backgrounds in performance, music, and working with youth groups. Their entire presentation gives you the sense that they truly care about the kids who are there and lifting them up to be better citizens of their schools and the world. If we all faced our fears and stopped ridiculing others for their differences or failings,  or even successes, we would have a much easier time being our authentic selves. Some of the things that my small group listed as fears are standing out too much, being different, not being in the right activities, smelling weird, dressing weird, not looking right.

They asked a few of us adults to share our own stories. A couple women talked about a time in middle school when they were singled out as different or someone to ridicule because of how they dressed or who they liked (boy-girl issues). I talked about being different, feeling different. That I was the one who liked to write stories, and that even today, I feel like I'm different because I'm the only one of my friends in this community who sits around coffee shops and writes plays. I hope my message was Dare to be Different. The presenter said, "It sounds like you're taking a risk to be your authentic self."

At the close of the day, we sat in a large group. The presenters handed out cards and asked us to write one change we could make in ourselves to improve our community. Then, they asked people to get up and share what they'd written. I was moved to tears as 6th graders got up and talked about being kinder, including those who are left out, stopping their bullying, and being nicer to siblings. Getting up and sharing is a very brave thing to do. I was inspired by those young people.

Go. Create. Inspire!
And, dare to make a difference.

Journaling Prompt:  What is one thing you can do to improve the community where you live and help those who might be hurting?


Wednesday, February 15, 2012

Risotto al Merluzzo e Peperoni (Codfish and roasted Red Peppers)


Who said there was nothing for dinner?
This is what happens when you only have one of everything left in the refrigerator and freezer.   One piece of codfish, One roasted red Pepper, some extra Roasted yellow pepper and some good salty Sicilian capers, yields one great Risotto.
Serves 4 people
Ingredients:  One 12 oz piece of codfish
2 cups of Arborio rice
3 tablespoon olive oil
2 tablespoons white onion
2 tablespoons salty capers
1-2 roasted red and yellow peppers, drained and cut up
4-5 cups vegetable or fish stock heated
one cup of white wine
In a deep skillet or Risotto pan, heat your oil.  Saute your onion until fragrant.  Cut up your fish into 1 inch bite size cubes.  Saute in your pan until opaque.  Add 1/2 cup of white wine and let evaporate.   Remove your fish from the pan and set aside.  In the same pan, add your rice and mix.  Add another 1/2 cup of white wine and let the wine evaporate some.  Begin adding your liquid.  Keep adding  in your liquid,  a cup at a time. Let each evaporate some after each addition.


 Keep cooking in the same fashion for approximately 18 minutes.  Make sure your liquid is evaporating in a slow steady pace. You want it boiling away on medium/ low.   Add your fish, peppers, capers, back to the pan and continue to stir for two more minutes.   Turn your heat off and let rest for approximately 5 minutes before serving. 

Give it another stir and place in serving bowls.  Serve topped with some fresh parsley and a great big glass of Pinot Grigio.  Buon Appetito.

Tuesday, February 14, 2012

Author David Treuer

Quote of the Day:  I once heard a journalist state that to write a book of nonfiction, a book about the lives of others, the writer had to feel in his gut that his informants owed him something, that he owned a piece of their lives.  But I don't think that is true. I think the opposite is true. I don't think my family or my people owe me anything. I feel that I owe my life to them and I set out to write a book that reflects this, reflects the debt I owe them, and does them honor.  To understand American Indians is to understand America. This is the story of the paradoxically least and most American place in the twenty-first century. Welcome to the Rez.
~ David Treuer, author of Rez Life

Me, David, and Krista, my publicist

Krista and I found a sweet way to spend our Valentine's lunchtime. We went to our local public library to meet author David Treuer and hear his presentation on his newest book, Rez Life. David is Ojibwe from Leech Lake Reservation in northern Minnesota. He has recently moved to California where he is a professor of literature and creative writing at USC in Los Angeles. He said that when he told his friends from Minnesota where he was moving they said, "Why would you want to move there? It's so dangerous."

David has an amazing perspective of life both on and off the reservation. He understands that people, traditions, treaties, and boundaries are complex. He brings to light both personal and regional history in his book. Brainerd is one of the first stops on his national book tour.

David said that researching this book was like going back to school. He dug deeper and learned more about his family, his people, and his nation. While he was digging and researching and writing, he kept thinking of his own three children and how this is their story, too. He dedicated this book to them.

Thanks, David, for the great talk today, your words and reading, and the connection we made. Visit David Treuer's website to learn more about the author and his books and to see if he'll be in a bookish place near you. He is delightful to meet and interesting to listen to. I'm eager to start reading Rez Life. 

Go. Create. Inspire!

Journaling Prompt:  Do your libraries or schools invite authors and artists? Write about some of the people you've met, what you enjoyed about their presentation, or whom you would like to see?

Baci Chocolate Gelato at Home~


This is the closest Gelato you will ever have at home  without going to a speciality ice cream shop. It's simple and easy to do at home. Why do we think Gelato is complicated to make?  Use this for your base to make any flavor your like.  In fact, leave out the cocoa powder and make Fior di latte.  The possibilities are endless.  Make any you like.   Good, quality ingredients yeild a fantastic result.  I found my husbands secret stash of Baci Perugina Chocolates from Perugia Italy.  These dark chocolate Italian kisses still come with a love note inside.  In the center of the chocolate you will find a large hazelnut. They are hard to resist out of the box.  Broken into pieces, you just need a few for a wonderful result.  This recipe yields slightly under a quart or 24 oz of gelato.
Ingredients:  One Ice cream maker.  I keep my insert in the freezer so it's always ready to go.
3 cups of Whole Milk
3/4 cup sugar
1/2 cup good quality unsweetened cocoa powder. (Look for one with the highest percentages of Cacao).
3 tablespoons of CORNSTARCH
4 Baci Perugina Chocolates (You may use as many you like. 4 per pint seems to be a nice balance)

In a bowl mix together your sugar, one cup of milk, cocoa, corn starch and set aside. 
In a saucepan heat 2 cups of milk until hot and bubbly around the edges. Be careful as you just want it to be just under the boiling point overall.  If you milk begins to smell or burn, start again.   Quickly but slowly (with your heat off),  whisk in your milk/sugar/cocoa/cornstarch  mix until combined.  Continue to mix well.    Turn your heat back to low and mix until your sugar and cocoa has dissolved.   This should take no more than 8 minutes. Taste to make sure your sugar has melted.  Pour into a container and chill overnight or for at least 6 hours in your refrigerator. 
At this point lay your chocolates across some wax or parchment paper.  Cover with another piece of  paper.  With a mallet, hammer or back of a glass, gently crush your Baci Chocolates.  Add to your mix.


Set out your ice cream machine with your chilled insert and turn on. 
Combine your broken chocolate pieces with your mix then gently pour your Gelato mix into your ice cream maker. In 20-25 minutes you wll have creamy Baci Gelato.
Pour your Gelato into a container and place in your freezer until ready to use.  It can be made up to 3 days in advance.  Remember, the longer it's in the freezer, the harder it will become. To prevent it from icing over the top, place a piece of wax paper between your gelato and cover.  Close your lid tightly.  You will have to set it out for 10 minutes before scooping out and serving.  Buon Appetito. 


Special Note:  The general rule for Gelato making is One cup milk / one tablespoon Cornstarch.  This will yeild your best, creamy result. You do not need eggs~  Enjoy! 


Monday, February 13, 2012

Pollo alla Romana (Chicken Roman Style)


Red Bell Peppers, Chicken and Tomatoes

You better have some extra crusty bread on hand for this dish.  Pollo alla Romana or chicken Roman Style, will have you going back for more.  Served traditionally in a Trattoria or family style Restuarant, in Rome Italy, you may want to wear some comfortable clothes to the restaurant.  It will be hard to stop eating.   Here is my version based on a very traditional recipe handed down by my husbands Aunt Dora, a Roman Native.
Ingredients: Serving 4 people

3 tablespoons olive oil and one tablespoon vegetable oil
One 4-5 pound chicken cut up into small pieces/ 80 percent of skin removed.
1 teaspoons of pepper
2 teaspoons of salt
1/2 cup chopped white or yellow onion
1 cup of white wine
2 cups of of chopped tomatoes and their juice
1/2 cup of water
2 red bell peppers, seeded and sliced thin
3 large cloves of garlic diced into tiny pieces.
Basil or parsley for presentation
Method:
If you can, begin the night before.  Clean and cut up your chicken.  Squeeze some lemon juice all over your cleaned chicken.  Toss and cover your chicken and place in the refrigerator overnight.  (This will remove the game taste from your chicken).
The next day remove your chicken from your refrigerator approximately 30 minutes before cooking. Dry with paper towels.  Add one teaspoon of salt and one teaspoon of pepper to your chicken pieces.

Orange Bell Pepper was substituted here~

In a deep skillet, add 2 tablespoons olive oil and your vegetable oil.   Brown your chicken pieces for about 5 -7 minutes.  Set your chicken aside.   Using the same pan, drain your fat.  Take a paper towel and wipe out your pan and set back onto the stove. Turn your heat to medium.  Add your last tablespoon of olive oil to the same pan. 

 Add your onion, garlic and red bell peppers.  Add your teaspoon of salt.  Cook until your vegetable are wilted and fragrant, about 5 minutes on medium.  

At this point add your chicken back to the pan. 


Add your white wine scraping the bottom of the pan.   Add your tomatoes.  Add a teaspoon of salt.  Reduce your heat to a simmer.  Place your lid to your pan ajar, and let cook until the oil separates from the chicken and a ring forms away from the chicken along the rim of the pan.  This should be cooked through in about 45 minutes.  Buon Appetito~


Sunday, February 12, 2012

Excellent Community Theatre

Quote of the Day:  Atticus is the same at home as he is at the office. Scout from To Kill a Mockingbird. It's a line I remember from the first time I read the book. It says so much about Atticus' character. I also like, "You got the walkabouts, Jem?" Made me chuckle. And, "Stand up, Miss Jean Louise. Your daddy's passing by." When Atticus exits the courtroom and Scout is sitting in the "colored" balcony. That one's from the book. I didn't hear it in the play.

Scout and Atticus
photos by Steve Kohls of The Brainerd Dispatch

Scout and Calpurnia


Central Lakes Community College had a marvelous production of To Kill a Mockingbird which opened this weekend. I went on Saturday night with a friend. It's done at the college, but also includes community members. The young lady who played Scout was outstanding. Two other boys are in it, and they were terrific. The actors all played their parts so realistically. I was emotionally involved with the play from the start. I felt fear, anger, sadness, and I cringed at the racial slurs and ached for the injustice. This play is heavy on the male roles, and the director Dennis Lamberton found excellent actors to fill them. The man who played Atticus hadn't done anything in theatre in over 30 years. I would have never guessed. His performance moved me to tears.

They have performances this week, Wed. through Sun. Click here for ticket info.

Then, on Sunday, my son Bobby and I drove over to Alexandria for their community theatre production of One Flew Over the Cuckoo's Nest. I had done some acting on that stage when I lived in that area. I knew the director, Ann Hermes, and several of the actors, including my friend Pete Woit. Again, the performance was outstanding. What an incredible group of men that Ann found to fill these roles. I find this story to be terrifying. While some of the actions of the patients are humorous, it has heavy themes and strong language. The evil nurse has all the power. Her mission is to control, not heal. All the actors played their parts to the fullest. I was amazed at the three main characters, Nurse Ratched, McMurphy, and the Chief, and how believable they were.

They will be performing Feb. 17-19, in Alexandria. Click here for tickets info.

Often when I watch plays, I look for roles that I would want to play. I didn't see anything for me in either of these plays. They were heavy on male roles, like I said, and nothing for a woman my age. That's a common problem in many classic plays. I wrote a play that I would want to see and act in. It's about women, ages ranging from 18 to 65. I couldn't help but think about our show and how these women are already playing their parts so realistically that we aren't always sure if they're responding to a line as their character or themselves.

Live performances really make you think. They draw you into the story and you feel like you're part of the show as townsfolks, jury, patients, or coffee shop patrons.

Go. Create. Inspire!

Journaling Prompt:  When have you gotten lost in an artform?

Saturday, February 11, 2012

Chocolate Fudge Layer Cake with Vanilla Buttercream and Bittersweet Chocolate Ganache . . .


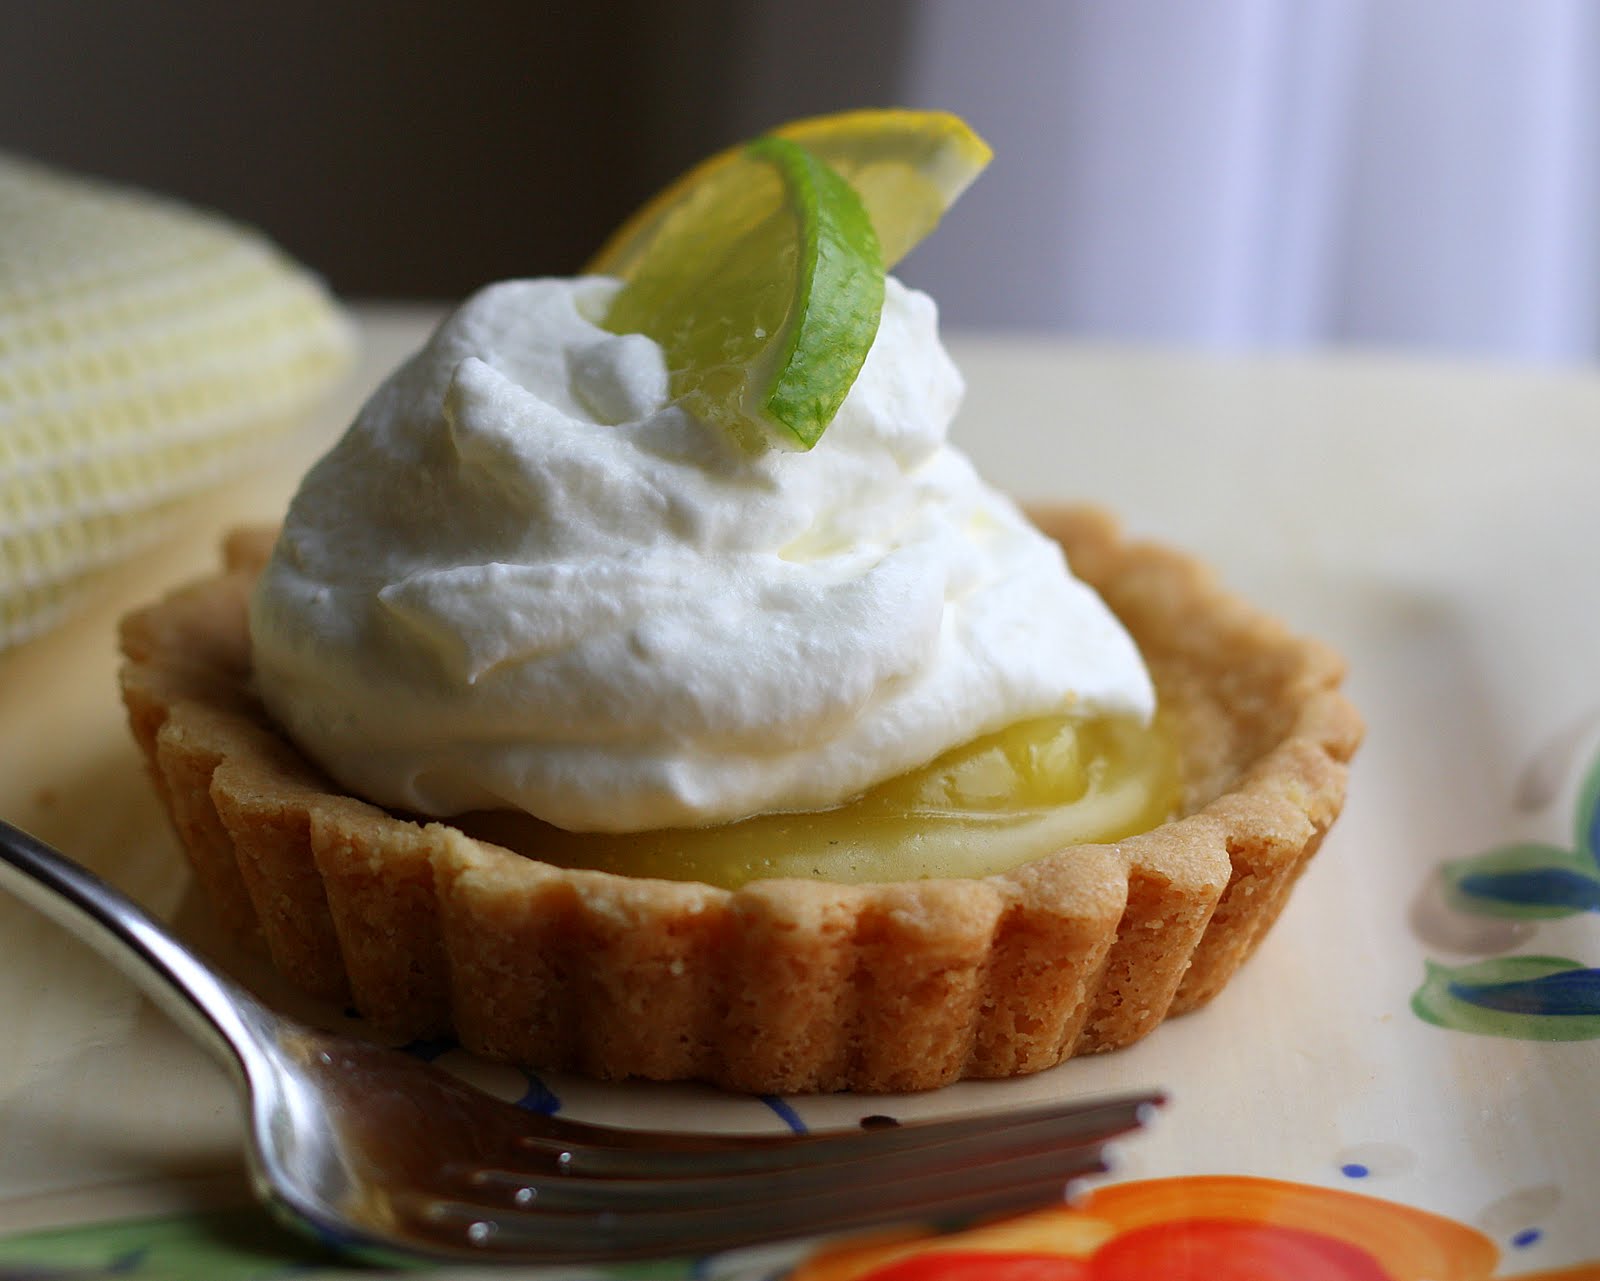
Last week in my Bakery Merchandising class, my fellow students and I spent hours preparing for a sale in the culinary school's retail bakery. One of my duties included piping huge swirls of fluffy vanilla buttercream onto dozens of yellow cupcakes, chilling them until firm, then suspending them upside down, one by one, and dipping them into a deep bowl of warm chocolate ganache.


At first my task progressed smoothly, but then the big white swirls started plopping off as I lifted the cold cupcakes out of the chocolate. Cursing under my breath with each failed attempt, I nervously fished out big globs of buttercream--once, twice, three times. Speed was of the essence that day and, not wanting to gum up the works, I took immediate steps to remedy the problem. Soldiering on, I carefully refrosted some of the cupcakes, chilled them longer, rewarmed the ganache, and crossed my fingers.


Meanwhile, directly across from me a much younger student, who told me she'd been working in a bakery since high school, was deftly enrobing iced layer cakes in ganache. I kept glancing over as she ladled the fluid chocolate atop each cake, letting it move languidly down the sides before picking up a small offset spatula to cover any bare spots. Her sense of calm bordered on the meditative, and her technique produced beautiful results.

It made me want to do the same thing at home. Damn the cupcakes, I said to myself, full speed ahead with a big round layer cake in my own kitchen. 

Thus was the inspiration for today's cake. (A cake that would, I believe, make a sensational Valentine's Day dessert!)


About this recipe . . . 

From the book 
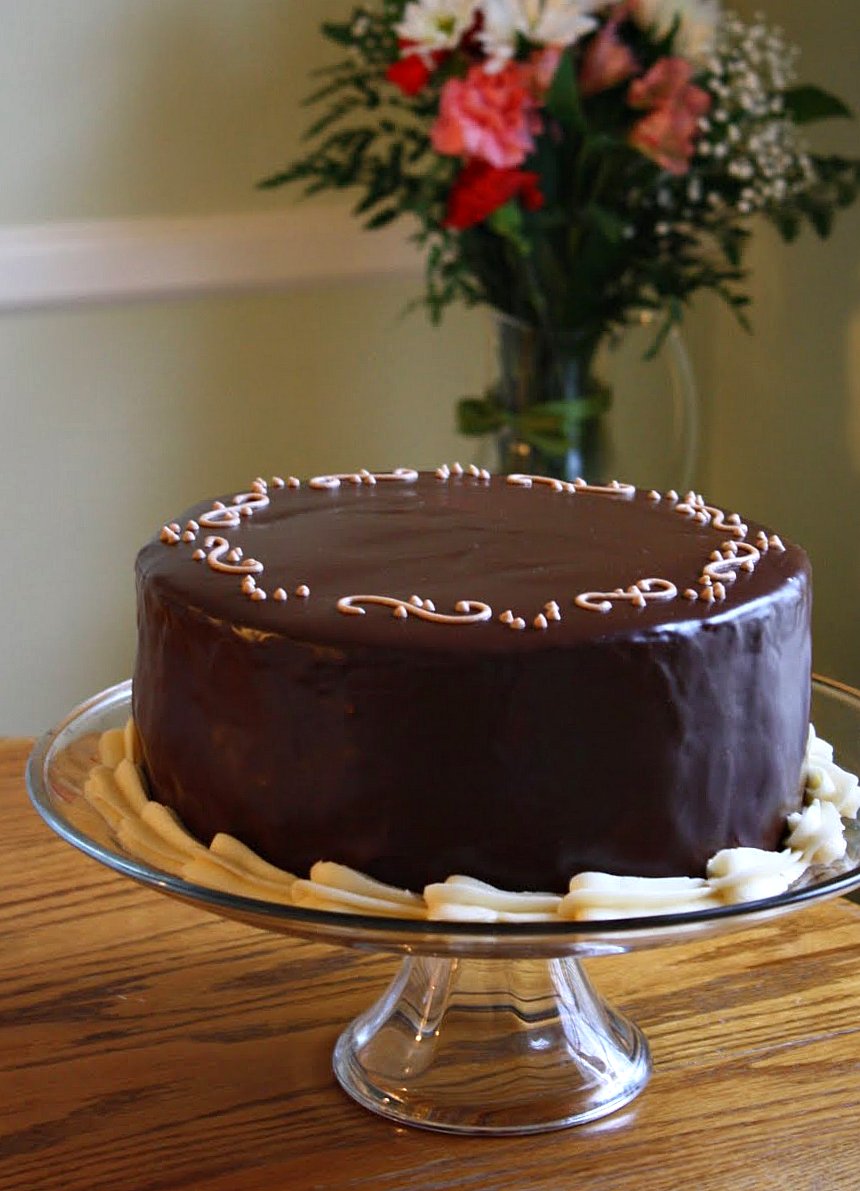
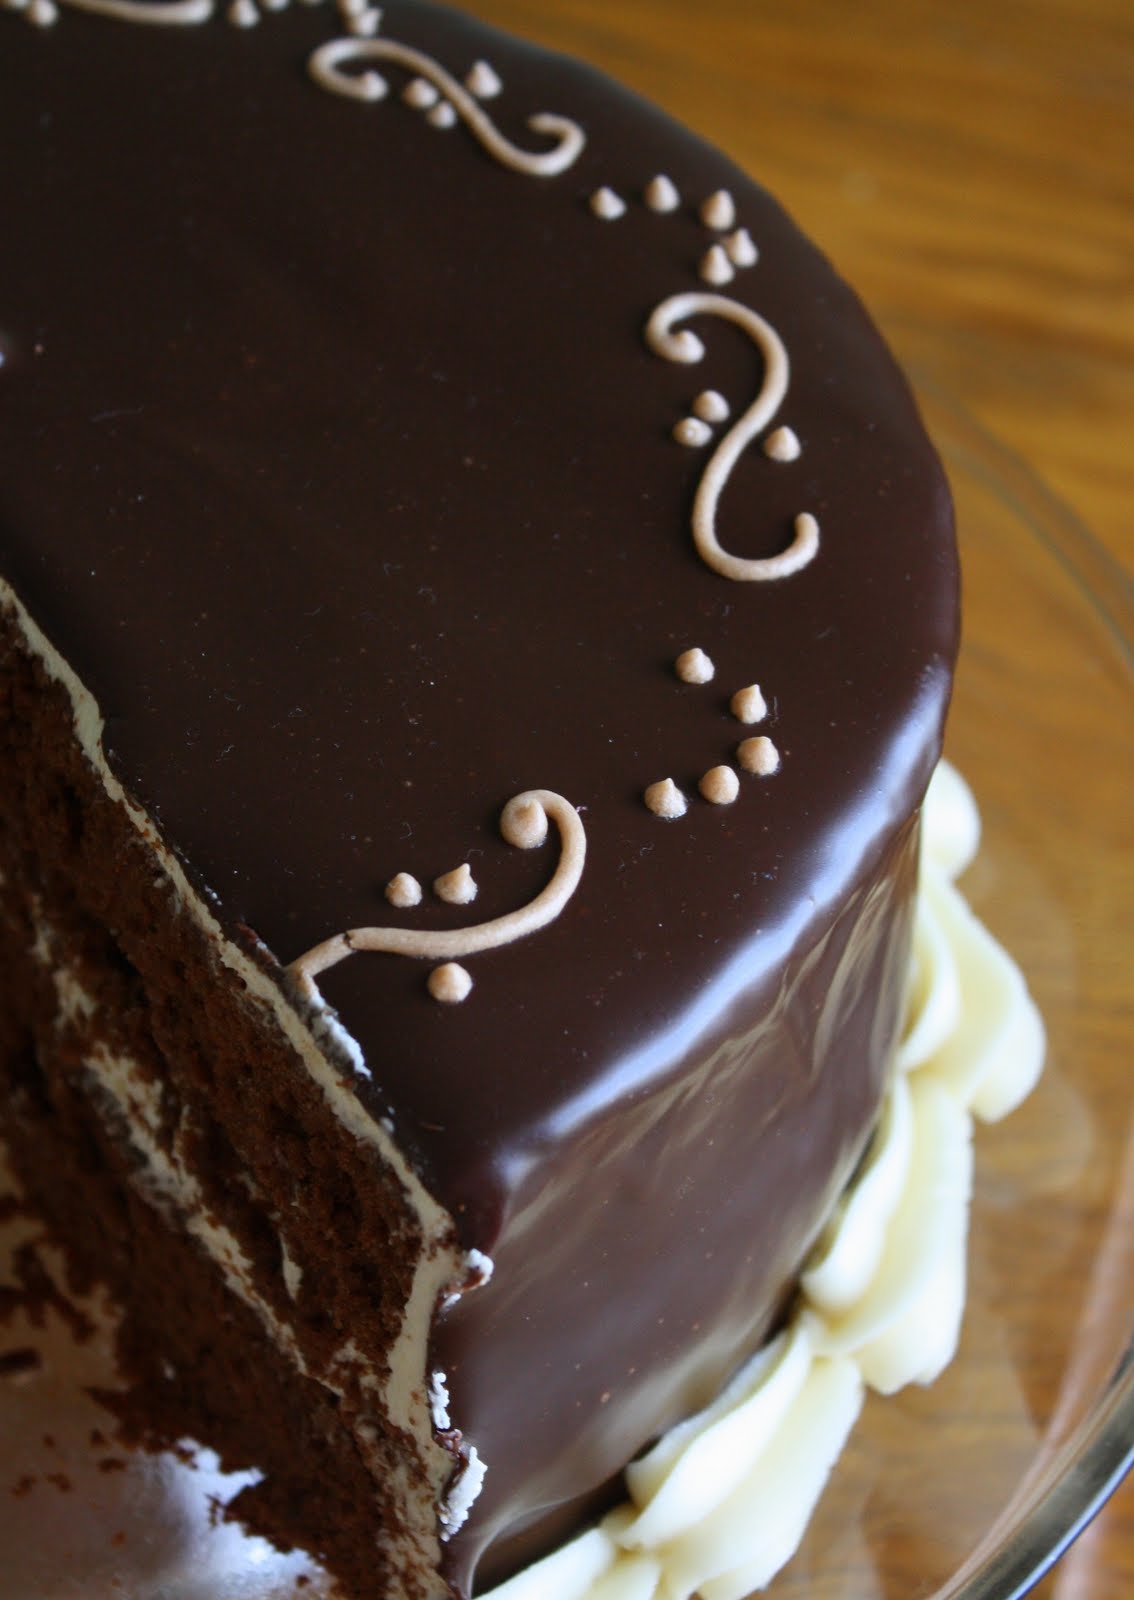
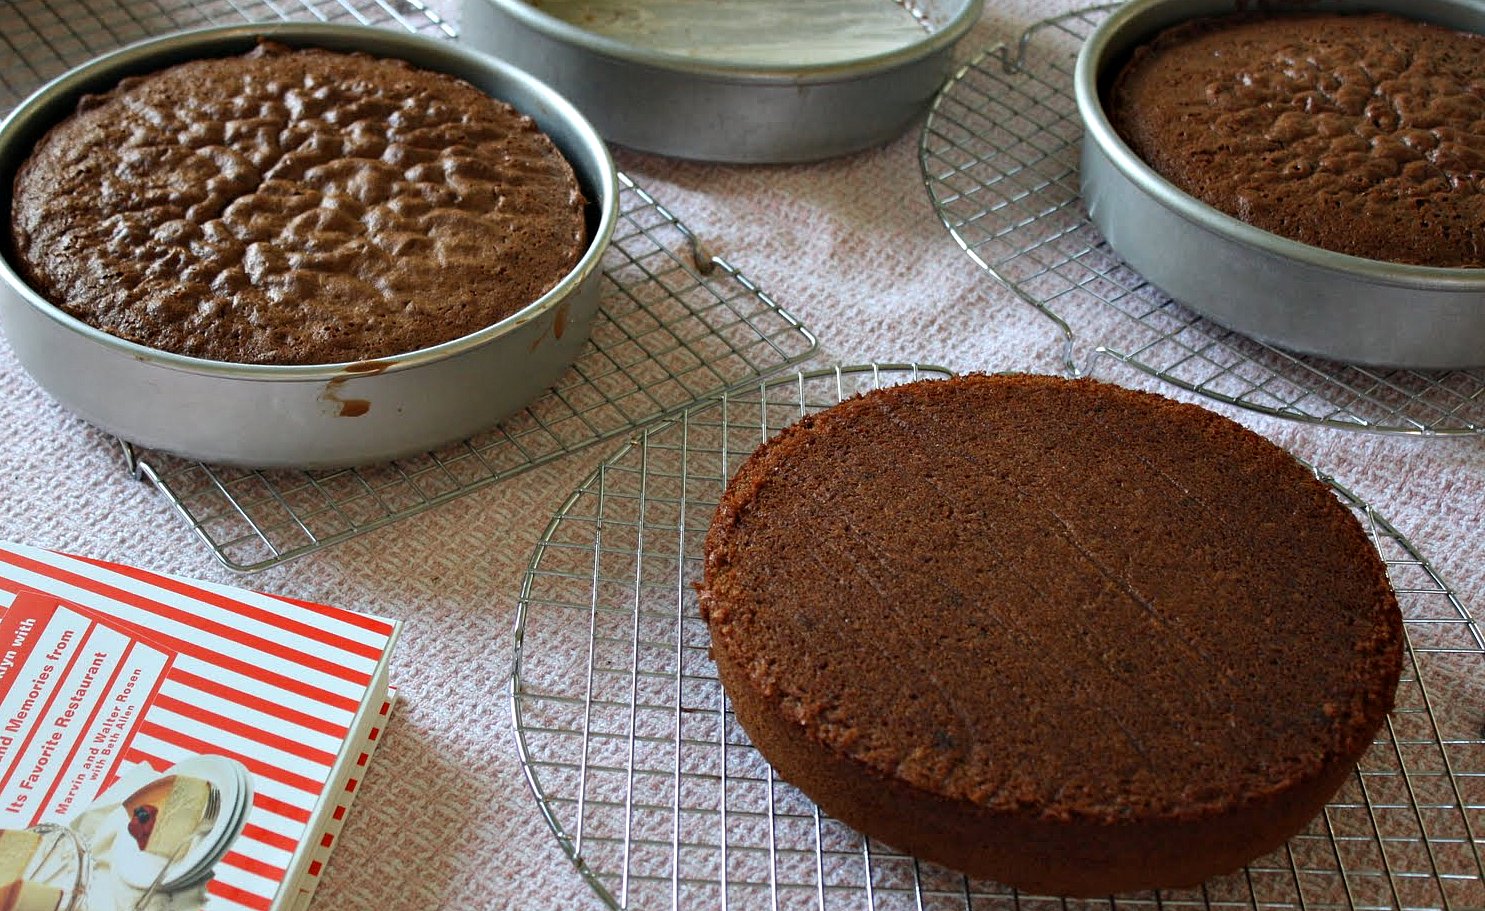
Welcome to Junior's! Remembering Brooklyn with Recipes and Memories from its Favorite Restaurant, this fudge cake is moist and densely textured. The recipe actually produces 
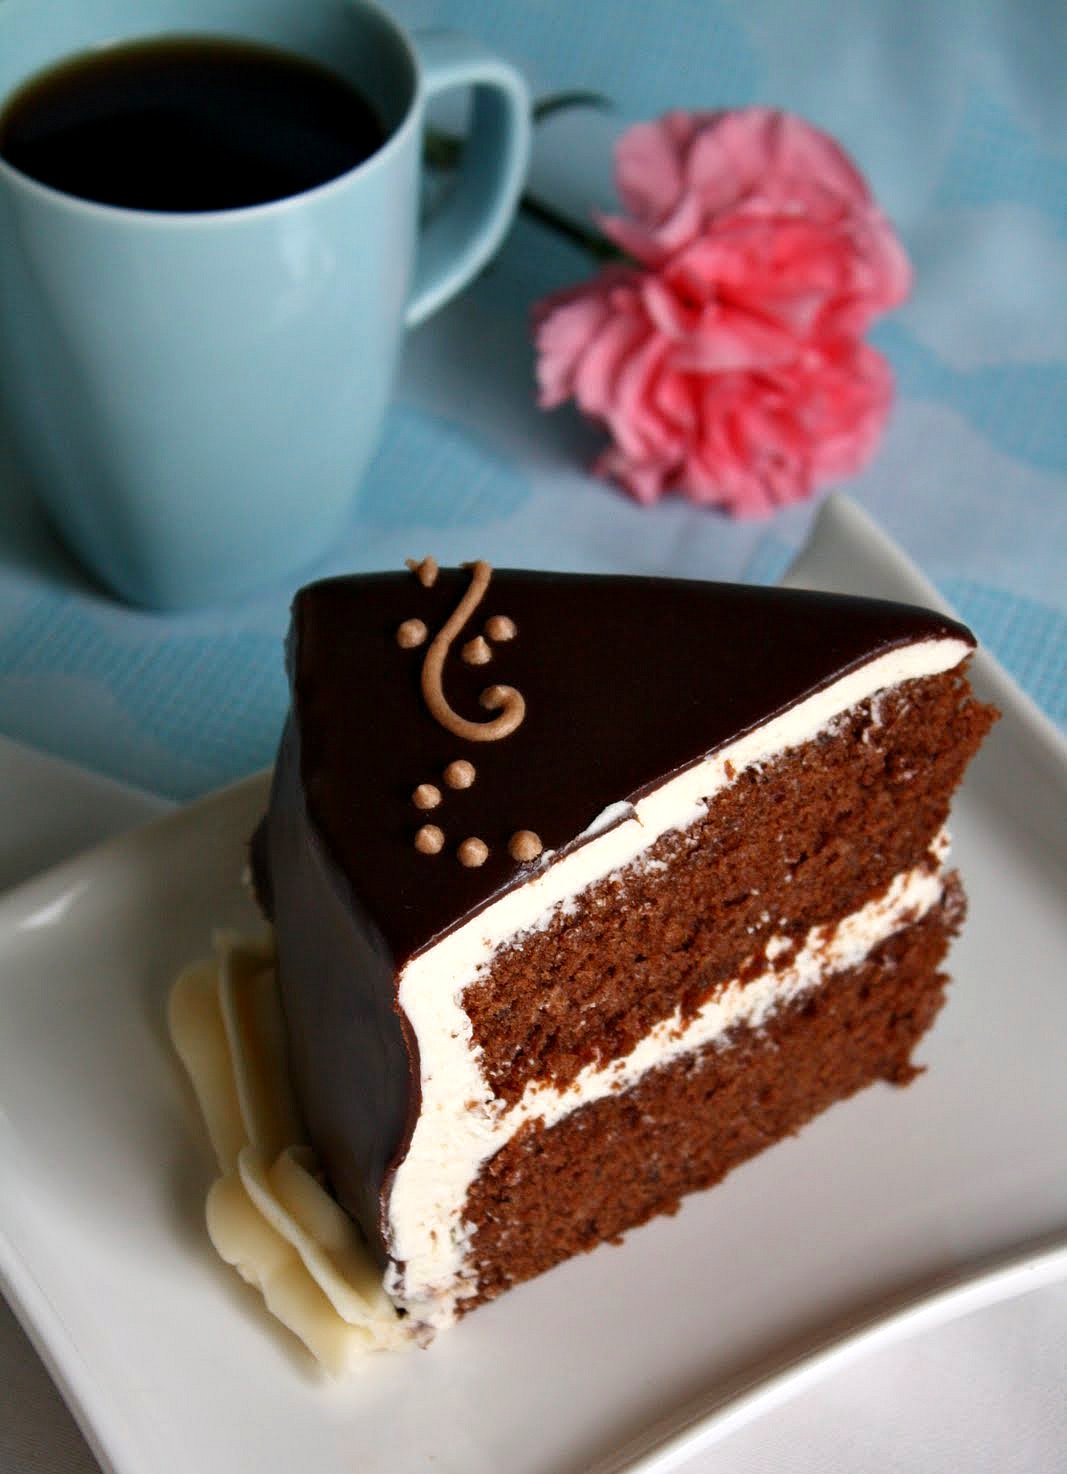
three hefty layers, but they were each so tall and obviously substantive, I decided to save and freeze the third one. If I'd actually used all three layers the iced and coated cake would probably have been 10" tall. (If you need a truly lofty layer cake, go ahead and use all three.) The vanilla buttercream recipe is also adapted from Junior's. The decision to apply a luxurious dark-chocolate ganache over the whole thing was, as you know, quite my own.


I bought this book last April in Junior's Restaurant (the one in Times Square) during a trip to NYC, and I have to admit I'm pretty fond of it (the book, yes, and also the restaurant!). My family and I visited Junior's twice while we were there, one night just for dessert (that famous cheesecake, of course), and again on our last morning in town before heading to the airport. We'd finished breakfast and were getting up to leave when it hit me that I could not exit Manhattan without my own copy, bright stacks of which were displayed near the entrance. Along with solid recipes, this volume offers an honest and deeply affectionate homage to Brooklyn--as it was decades ago, and as it is now. It's full of historical tidbits that are pretty engrossing for anyone who's interested in the evolution of a classic, family-owned, American restaurant. I began reading it at the airport, while awaiting our flight, and hardly put it down until our plane landed back in Detroit. I used one of Junior's cute paper coasters as my bookmark.


Chocolate Fudge Layer Cake with Vanilla Buttercream 
and Bittersweet Chocolate Ganache
(For a printable version of this recipe, click here!)

Yield: Makes one large, tall, 3-layer cake that, when iced and ganached, could probably serve 20 or more people.

Preheat oven to 350 degrees. Butter three round 9"x2" cake pans, place parchment paper circles in the bottom, and then butter the parchment (it's easiest to do this with a pastry brush, and do use unsalted butter). Place a rack in the middle of your oven.

Ingredients for the cake layers:

3 cups cake flour
1 Tbsp. baking powder
1 generous teaspoon of coarse kosher salt
1/2 tsp. baking soda
1/2 cup unsalted butter, softened to room temp.
1/2 cup vegetable shortening 
1 and 1/2 cups granulated sugar
3/4 cup light brown sugar, packed
7 large eggs, not cold
9 oz. bittersweet chocolate, melted and cooled to lukewarm
1 Tbsp. vanilla extract
2 and 1/4 cups milk (I used 2 percent.)

Onto parchment, or into a medium size bowl, sift together the flour, baking powder, salt, and baking soda.

In the large bowl of your mixer, using the paddle attachment on high speed, cream together the butter, shortening, granulated sugar, and brown sugar. Beat for several minutes, until the mixture turns light yellow. Scrape the bowl and beaters. Again on high speed, add in the eggs one at a time, beating for a couple of minutes after each addition. Stop and scrape the bowl and beaters.


Pour in all of the chocolate and vanilla, and continue mixing on high speed for up to 20 minutes. (Yes, I said 20 minutes--that's what the instructions indicate, and that's what I did. The batter is quite fluffy when you're done with this step.) Take the bowl off of the mixer now, and gently scrape again with your spatula.

Now, sift one quarter of the dry mixture over the batter and carefully stir (as opposed to just folding, which you will be inclined to do) it in. Then pour in one third of the milk, stirring to blend. Continue in this fashion, until you've incorporated all the flour and milk, stirring well after each addition.


Portion the batter equally into the three prepared pans, and smooth it out. Gently tap each pan on your work surface to help release air bubbles. Bake the pans side by side on the middle rack, but don't let them touch each other. (The cookbook suggests delaying the baking of one layer if you don't have an oven large enough to accomplish this, rather than baking one of the layers on an upper- or lower rack.)


Bake the layers for about 30 minutes, until a toothpick inserted in the center of each one comes out clean, and the sides of the cakes just begin to pull away from the sides of the pan. Cool the layers on racks for 30 minutes before inverting them onto racks (and removing any parchment still stuck to them) to finish cooling.


Ingredients for Vanilla Buttercream Frosting:

2 lbs. (8 cups) of confectioners' sugar, well sifted (I always use Domino's 10x for frosting. Much less lumpy than the cheaper stuff.)
1/2 tsp. salt
1 and 1/2 cups (3 sticks) unsalted butter, softened to room temperature
1/2 cup margarine or high-ratio shortening, not cold (I did not use margarine, which the original recipe indicates. Instead, I used Sweetex, which is a "high-ratio" shortening typically used by cake decorators. Trans-fat free, it adds stability to frostings--ie., helps them hold up without softening in warm temps--and doesn't lend a greasy mouth-feel the way vegetable shortening can. It also helps make frosting easier to spread. You can buy it at cake decorating supply stores, but be forewarned that it's not cheap.)
2 Tbsp. light corn syrup
1 Tbsp. and 2 tsp. vanilla extract
1 scant tsp. almond extract
1/2 cup heavy cream, not too cold

Onto a parchment sheet, or into a large bowl, sift together the confectioners' sugar and the salt, being sure to break up out any stubborn sugar lumps. In the large bowl of your electric mixer, using the paddle attachment on high speed, cream together the butter and margarine/Sweetex; beat for about three minutes, until light yellow. Still on high speed, add in the corn syrup and vanilla. Stop and scrape the beaters and bowl. Now on low speed, add the sugar in two additions, beating well after each one. Pour in the cream and blend until the frosting seems of reasonable spreading consistency; if it seems too thick, add in more cream as needed, a teaspoon or so at a time. Keep the frosting tightly covered until you're ready to use it. If you won't be using it within a couple of hours, cover and refrigerate it. 

Ingredients for the Bittersweet Chocolate Ganache:

8-10 oz. good quality dark chocolate (I tend to use Ghirardelli if I don't want to spend a fortune. If I'm flush with cash, I'm more likely to use Callebaut, and more rarely Valrhona. Bittersweet ganache works well with this cake since it balances the sweetness of the buttercream frosting.)
5-6 oz. heavy cream (The amount can vary a little bit, depending upon how soft you want your ganache to be.)
2 tsp. soft unsalted butter

Chop the chocolate into small pieces and place it in a heatproof bowl.

In a small sauce pan, heat the cream slowly until it simmers. Pour it over the chocolate, add the butter, and do not stir. Let the mixture sit undisturbed for a couple of minutes. Stir until the chocolate is obviously completely melted; don't whisk, as you don't want to add bubbles. As the ganache begins to cool, you'll be able to get an idea of its texture. If it seems it will be too thick to ladle onto your cake, stir in a little bit more warm cream, adjusting as needed. If you won't be using the ganache right away, keep it well covered in the fridge. It can be warmed up in a double boiler, or gradually in the microwave if watched very closely. 


To assemble the cake:

Place your first layer of cake on a cardboard cake-circle so you can more easily lift and move it; this will be a big help when it comes time to add the ganache coating. Frost the top of the bottom layer.  Frost the top of the middle layer. Frost the top of the top layer and the sides of the cake as smoothly as you can, ideally with an offset spatula. It doesn't matter too much if some crumbs show through in the frosting at this point since the cake will be covered in chocolate, but any obvious lumps should be smoothed out to ensure a nice finish. 

Place the cake, still on its cardboard circle, over a cake rack that's been placed atop a rimmed baking sheet. 


When your ganache is at the right consistency (it should drip easily from a ladle, like a very pourable gravy), ladle it directly onto the top center of the cake, letting it spread out and drip down the sides. The excess ganache will drip off the bottom edges of the cake onto your baking sheet (that excess can be saved and used again, assuming it doesn't contain crumbs, etc.). Use a small, metal, offset spatula to smooth out, and dab delicately at, any bare spots on the top and sides of the cake; work fairly quickly since the ganache will start to set up as it cools. Let the ganache-covered cake sit on the cooling rack over the baking sheet until the ganache seems somewhat firm. Move the cake onto its serving plate, sliding a firm metal spatula beneath it to help lift it up off the cooling rack. Before serving, add on any decorations you prefer (whipped cream swirls, piped frosting, chocolate-dipped strawberries, whatever you like).


(If you'd like to comment on this post, or to read any existing comments, please click on the purple COMMENTS below.)