Monday, July 30, 2012

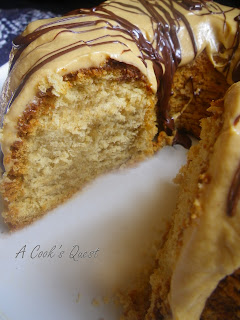
Peanut Butter Pound Cake

Secret Recipe Club


Peanut Butter Pound Cake

This month's recipe for the Secret Recipe Club comes from the blog Loving Life written by Kirstin.  What I enjoyed about reading through this blog is the personal aspect Kirstin brings to all of her posts.  Not only are there recipes, but also daily life details of one family from the Pacific Northwest.  I love learning about those who write the blogs and getting to know about their life and what is important to them.

I have shared on my blog a time or two that my husband's favorite dessert flavors are chocolate and peanut butter, in fact I have a chocolate and peanut butter category on my blog just so I can quickly find a recipe whenever he has a craving.  When I found this peanut butter pound cake at Loving Life I knew it was the recipe that I would be making for this month's reveal.
Peanut Butter Pound Cake

As pound cakes go this one fits the bill.  It is dense, but moist, and very full of flavor.  Alone it reminds me of a peanut butter cookie in cake form, but then the frosting is added leaving the eater with a peanut butter explosion of flavor...oh yes, it was tasty!  I didn't change a lot about the recipe.  I doubled the amount of vanilla, thinned the frosting so that it was more of a glaze, and added a chocolate drizzle on top for hubby.  I did find that it took 1 hour and 20 minutes to finish baking. This may be due to the size of my pan.  I used a large stoneware fluted pan that utilized "most" of my batter.  If you make this, be sure to begin checking your cake for doneness at about 55 minutes.  ENJOY!!
Peanut Butter Pound Cake

Peanut Butter Pound Cake
Recipe Source: Modified slightly from Loving Life

Cake:

1 cup butter, softened
2 cups sugar
1 cup light brown sugar, packed
1/2 cup peanut butter
5 eggs
2 tablespoons vanilla (original recipe called for 1)
3 cups cake flour
1/2 teaspoon baking powder
1/2 teaspoon salt
1/4 teaspoon baking soda
1 cups whipping cream or whole milk

Prepare a large tube pan or bundt pan and preheat the oven to 325 F.  Depending on the size of your pan you may have extra batter left over, use this for cupcakes.
In a large bowl or kitchen aide mixer cream together the butter and sugar until light and fluffy.  Add the brown sugar and peanut butter mixing until well combined.  Add the eggs one at a time, mixing well after each one.  Add in vanilla.
In another bowl whisk together the flour, baking powder, salt, and baking soda.  Add about 1/3 of the dry ingredients and then about 1/3 of the milk.  Continue adding the dry ingredients and the milk alternating until they are both added and well combined.
Fill the prepared pan about 3/4 full (remember you may have extra batter left over depending on the size of your pan).  Bake for 60-90 minutes or until a toothpick comes out clean.  
Cool cake for 10 minutes then turn out to finish cooling.  When completely cooled frost with frosting and top with chocolate drizzle or shavings.
Frosting/Glaze: 
1/2 cup butter, softened
1 cups peanut butter
2 cups powdered sugar
3 Tablespoons milk (more or less depending on how thick or thin you want it. I used close to 7 tablespoons to get the consistency I wanted.)

In a kitchen aide bowl or medium bowl with an electric mixer combine the butter and peanut butter until well mixed.  Add in the powdered sugar and milk until the desired consistency is reached.  
**I should have cut the original recipe in half because I ended up with a lot of glaze, but it was tasty and with some additional powdered sugar to thicken it up it tasted great on graham crackers!**
Chocolate Drizzle:
1/2 chocolate chips
1 teaspoon oil
Melt together over a double boiler over low heat until well combined.  Drizzle over frosted cake.

Friday, July 27, 2012

Apple Cake


When your in-laws give you three cases of apples it means it is time to make delicious desserts!  Apples are my all time favorite fruit to bake with and it won't be difficult to use them all up.  My father-in-law made a request for a batch of apple butter, my husband asked for dried apples to pack during hunting season, and I wanted to try some new recipes.

The first recipe I tried was this delicious French apple cake.  It it dense with chunks of apples and rich with an almost custard flavored cake, but light and delicate too.  I would put the cake to apple ratio at about 50/50.  This cake was gobbled up quickly by my family.  I thought it was best at room temperature with a sprinkling of powdered sugar; however, there is absolutely nothing wrong with it served warm with fresh whipped cream!

I only made one change to this recipe--the original calls for 3 tablespoons of rum; however, I didn't have any so I left it out of this recipe.  If you have it, add it in and let me know how you like it.  ENJOY!!

Marie Helene's French Apple Cake  published in Dorie Greenspan’s Around My French Table
Recipe Source: Slightly adapted from Kirbie's Cravings


3/4 cup all-purpose flour
3/4 teaspoon baking powder
Pinch of salt
4 large apples (it’s suggested you use 4 different kinds)
2 large eggs
3/4 cup sugar
1/2 teaspoon pure vanilla extract
8 tablespoons unsalted butter, melted and cooled

Instructions

Preheat the oven to 350 degrees F and center a rack in the oven. Butter an 8 inch springform pan (I lined mine with parchment paper). Line a cookie sheet with parchment paper to put your pan on, or you can also wrap tin foil around the base of the pan like I did.

Peel, core, and chop the apples into 1 inch chunks.


Sift the flour, baking powder, and salt together in a small bowl.

In a medium bowl, beat the eggs with a whisk until light yellow and foamy. Add the sugar and vanilla and  whisk until smooth.  


Stir in half of the flour mixture, when it’s incorporated, add half of the melted butter, followed by the remaining flour mixture and butter. Mix in between additions so you have a smooth, thick batter. 

Fold in the apples with a rubber spatula. 

Pour batter into prepared pan. Spread with spatula so the batter is somewhat even.

Bake for 50-60 minutes, or until the top of the cake is golden brown and a knife inserted in the center comes out clean. Transfer to a cooling rack and cool for five minutes.  Top with powdered sugar and freshly whipped cream.


Rustic Country Bread . . . Humble Loaves from Your Two Hands . . . Quietly

Do you ever have days when you want to bake, but you don't feel like making a big racket in the kitchen? You just want to do it quietly, unaccompanied by the clatter of metal pans and the growl of your mixer? Maybe the kids are still asleep and you're relishing the momentary solitude, the morning's so calm and peaceful you can't stand to break the spell. Well, I know just how you feel.


Days like that call for recipes exactly like this one. It's guaranteed not to wake the neighborhood. All you really need for it, once you've measured the ingredients, is two big bowls, a spoon and spatula, a bench scraper or sharp knife, and a good work surface for kneading. That's basically it. Oh, and you'll definitely need your own capable hands because they, my baking friends, are the most critical component. And, thankfully, they're quiet.

Now let's talk about the word "rustic" for a minute. The dictionary defines it in a variety of ways. "Characteristic of, or resembling, country people," "made of rough limbs or trees," and my own personal favorite, "lacking in social graces or polish." I think that last one applies pretty safely here without causing offense. After all, this bread is mixed by hand, shaped by hand, and it'll accept a few customizing tweaks without having a high falutin' hissy fit. It knows it's naturally good, and doesn't have to try too hard.


You can easily whip up a couple of these loaves without feeling afterward like you've just run a race or been on a bad job interview. You know how some recipes kind of make you feel like that? Where you can just tell, about halfway in, that things are not gonna turn out well? With this bread, you don't have to worry. It won't let you down. So slide your dough into the oven and prepare for happiness. Maybe even full-blown joy! At the very least, expect to experience a sense of peaceful contentment in your bread baking powers. And don't forget to enjoy the quiet while it lasts.

About this recipe . . .

Adapted from The Farm Wife blog's formula for "Country White Bread," these loaves can be made panned or unpanned, and will accept modest alterations pretty well. I added in, with the bread flour, a little bit of flax meal, along with a smidgen of wheat bran and wheat germ, to give it a little more character and substance. But I've also made it entirely with white flour, too, and that's a great loaf also.

I love bread that doesn't need to bake in a pan, don't you? I baked these on a stone, but you can certainly bake them atop parchment on a baking sheet.


Rustic Country Bread

(For a printable version of this recipe, click here!)

Yield: Two standard size round loaves

1 and 1/2 cups very warm water (about 120 degrees or so)
1/2 cup milk (I used 2 percent.)
2 tablespoons granulated sugar
2 teaspoons salt (I used coarse kosher salt.)
3 and 1/4 teaspoons instant yeast (I almost always use this kind of instant yeast, which requires no proofing; if you want to use active dry yeast instead you'll need two standard size packets, and you'll want to proof them first in a bit of the warm water before adding that into the bowl.)
6 cups bread flour, and possibly a little more for flouring your work surface
1 and 1/2 tablespoons flax meal
1 tablespoon wheat bran
1 and 1/2 teaspoons wheat germ
2 tablespoons of unsalted butter, softened to room temperature
2 large eggs, lightly beaten

In a large bowl, lightly whisk together the sugar, salt, instant yeast, three cups of the bread flour (only three), the flax meal, wheat bran, and wheat germ. Add the water and milk into this, stirring until very well blended.


Add in the butter and eggs, and stir until fully combined. 


Now, gradually add in about two and one half cups more flour, stirring until the dough looks like a rough shaggy mass that pulls away from the sides of the bowl. 


Scrape the bowl and dump the dough out onto a well floured work surface. (Also flour your hands well, and keep a handful of extra flour nearby for this purpose.) 


Knead the dough until it feels smooth and elastic, working in the final 1/2 cup of flour as you do so; this may take at least five minutes of steady kneading, more or less. 


Use oil, vegetable spray, or shortening to completely coat the inside of another large bowl. Put your dough into it, turning it over once so it's coated all over. Grease/spray etc. one side of a sheet of plastic wrap and use it to cover the bowl, greased side down. Place the bowl in a warm spot and let the dough rise until it has doubled; that should happen within an hour (mine took barely 40 minutes on a hot day). 


Press your fist into the risen dough, here and there, a couple of times to deflate it. Turn the deflated dough over in the bowl and cover it again with the greased plastic wrap. 

Again, let it rise until doubled. And, again, this may take up to an hour depending on how warm your house is. When the dough has doubled, dump it out onto your work surface (only very lightly floured this time) and cut it into two equal parts using your bench scraper or a sharp chef's knife.


Shape each of the two halves into a shallow round, making sure to tightly pinch closed any seams. Sprinkle a very thin layer of cornmeal (or you can use a little flour) onto a couple of parchment sheets. Set the dough rounds on the cornmeal. Cover the dough with greased plastic wrap and let them proof (aka have their final rise) until about doubled. This might take half an hour.   


If you're going to bake the bread on metal baking sheets, preheat the oven to 400 degrees for at least 20 minutes. 

If you're using a ceramic baking stone, preheat the oven to 475 for at least half an hour so the stone can get really hot, then turn the oven down to 400 immediately upon placing the dough into the oven.

If you are using metal sheets, you can just slide the dough, still on its paper, right onto them when you're ready to bake. If you're going to bake on a preheated baking stone, you can still give the dough its final proof on cornmeal over parchment, but then gently move the proofed loaves onto a cornmeal-dusted baker's peel to transfer them to the hot stone (that's what I did).

Before putting the dough into the oven, use a little misting bottle of water (or, if no misting bottle, you can do this by wetting your hands and then gently patting the loaves) to moisten the top of the loaves. This will help prevent the loaves from bursting open as they bake. Also, it's a very good idea to squirt misty water quickly into the oven upon placing the dough in there, creating a nice steamy atmosphere (just don't aim right for the oven light).

Bake the loaves for about 20 to 25 minutes or so, until they're quite golden brown on the top and bottom. (The internal temperature of the loaves should be at least 190 when they're done; if you want to, you can stick a stem thermometer in the bottom of each loaf if you like. Under-baked bread will be noticeably dense/gummy inside, and just feel heavier when you handle it right out of the oven.)

Let the loaves cool on a rack for at least half an hour before slicing. Great for sandwiches, toast, french toast, you name it. Freezes well.


(If you'd like to comment on this post, or to read any existing comments, please click on the purple COMMENTS below.)

Wednesday, July 25, 2012

Escarole and White beans (Fagioli)


Ingredients:
One large bunch Escarole (about one pound or so)
4 tablespoons olive oil plus more to drizzle on plate
2 clove of garlic
3 cups of cooked white beans (Fagioli, great Northern or Cannellini)
One cup escarole stock (reserved from cooking your Escarole)
Pinch of baking soda
One tablespoon of salt for your water in oder for it to come to a boil.
One additional teaspoon to sprinkle on your Escarole and beans when it's ready.

Side dish or soup, this is such a healthy go to dish this time of year.  Even my son enjoyed it last night. I wonder where he gets that from?
Plenty of Fresh Escarole is rinsed, cut up and blanched. I even like to add a pinch of baking soda to help the Escarole retain it's pretty green color.  Salt the water and cook for a good 5-6 minutes.  Remember that once you add your Escarole, your timing begins when your water is boiling again.  Drain well.  Set aside.
Thaw your beans (about 3 cups). I keep a good amount in the freezer.  If you like to use a can, be sure to drain and rinse those beans.  On occassion, I have even given them a boil to remove that canned residue.  However, fresh is best, but you can get a good result either way.   Heat 2 tablespoons olive oil in a skillet.  Add some Rosemary.  When the Rosemary is fragrant remove from your pan and add 2 cloves of garlic cut up.   After just about 30 seconds, your garlic will be fragrant.  Add your Escarole, One cup of Escarole Stock,  turn your heat up just a little and continue to mix and cook until all your liquid is has evaporated in your pan except for about 1/4.  Add your beans, and cook for about 5 minutes. Remember your beans are pre-cooked.   Your pan will become quite dry.  You can remove from heat, drizzle some Extra Virgin Olivie oil and serve as a side dish or stand alone meal with some crusty bread.  Buon Appetito

Twice Baked Potatoes


In order to get ready for my family to go back to school in a few weeks I have been trying to stock my freezer with meals and side dishes.  With my recent discovery of the perfect baked potato I decided to make twice baked potatoes, and put them in the freezer for an easy side dish.  These potatoes have been around for a long while with many variations, I am sharing with you how I prepare them for my family.

This potato is delicious with a creamy cheesy filling, flavorful skin, and brown, crispy top.  We love them with grilled meat and a light salad or even for lunch once in a while. They are easy to change and adapt depending on your family's likes and dislikes.  I hope you ENJOY!


Twice Baked Potatoes
Recipe Source: A Cook's Quest

5 Baked potatoes, cooled slightly
1 cup sour cream
2 tablespoons butter, softened
Shredded Cheese
Salt
Pepper
Seasoning Salt

**The sour cream is an estimate.  The amount you will need will depend on the moisture in  your potatoes, along with the size of your potatoes.

When your potatoes are cool enough to handle slice them in half length-wise. (I made a lot more than five for this batch.  If you decide to do so remember to adjust your other ingredients.)


With a spoon, carefully scoop out the inside of the potato and place it in a bowl.  Make sure to be careful not to puncture the skin.


Mash the potato insides, and add the salt, pepper, butter and sour cream.   You want a creamy mixture that is a little thicker than mashed potatoes.  Add the grated cheese.  If needed add more sour cream or seasonings to achieve the flavor and texture you need.  

Spoon the filling into the empty shells.


At this point, you can bake the potatoes at 350 for 15-20 minutes and broil for a few minutes to brown the tops, or freeze for later.  If you decide to freeze the potatoes, place them in a pan and cover and freeze. 

To bake from frozen:
Heat oven to 350 F.  Bake 35-45 minutes or until centers are warm.  Broil for a few minutes to get the top nice and brown.  

Monday, July 23, 2012

Green Monster Smoothies


About a month ago my mother in law called me out of the blue and asked, "Do you want a tread-mill?"  to which I replied, "ummm, yes?"  And within the hour I had a treadmill in my garage just waiting to burn all those unwanted calories off of my ever growing hips.


Fast forward a  few weeks to when my mother in law was cleaning out her cabinets and stumbled upon a smoothie maker still in the box and never used.  She asked me if I wanted it or not, and, after considering what I had planned for dinner that night (NOTHING), I quickly snatched it up and became a hero when I made fruit smoothies and peanut butter sandwiches for dinner.  Thus, our love of fresh fruit smoothies was born in my kitchen.  


There are millions of ways to make smoothies both healthy and un-healthy.  So far ours have been relatively healthy.  We have been making them by tossing in fruit, ice, and milk or yogurt and blending away.  But, now I feel an obligation to create a REALLY healthy smoothie to have after I run walk the calories away on my new treadmill and become a healthier version of me.

Thanks to Pinterest it didn't take me long to find a recipe for a healthy smoothie.  What I like about this recipe, well all smoothie recipes really, is that I can change it up.  I can mix in any combination of fruit that I want and know that I am getting a ton of healthy vitamins in one meal.  I'm not so good at eating vegetables, especially those dark green ones that doctors tells us to eat, so the spinach is a great thing for me. I can't really taste it at all, but yet my body is benefiting from all the healthy goodness that spinach offers.

 Iowa Girl Eats, where this recipe came from, states:

  • Spinach is fat free, cholesterol free, low in calories, and very low in sodium
  • Spinach is an excellent source of vitamin A, C, K, iron, fiber, folate, and lutein
  • Leutin is an antioxidant that promotes good eye health, and may help prevent cancer of the liver, ovaries, colon and prostate, and even dementia.
  • Dole lab tests found spinach juice has twice the chlorophyll, eight times the calcium, six times the magnesium, 10 times the potassium, 15 times the vitamin C and 43 times the vitamin A of wheat grass juice

I stayed pretty true to the original recipe substituting only non-fat milk for the Vanilla Almond breeze and using only 2 cups of spinach.  Using less spinach reduced the bright green color of the original recipe, but that is OK,  it was YUMMY!  My children, as well as three of their friends, tasted it and said it was good, but no one was overly excited about it like I was.  Next time I think I may add a scoop of protein powder, omit the peanut butter, and throw in a few strawberries and blueberries.  YUM!

So go on, mix one up and ENJOY!  


Green Monster Smoothies
Recipe Source: Iowa Girl Eats

1 frozen sliced banana
1 Tablespoon peanut butter
1/2 cup 0% Vanilla Chobani Greek yogurt
1 cup Unsweetened Vanilla Almond Breeze (or other kind of milk)
4 cups baby spinach (or more, or less)


Directions:
Combine all ingredients in a blender and blend until smooth.

The Power of Art

Quote of the Day:  My imagination can picture no fairer happiness than to continue living for art. — Clara Schumann

The artist alone sees spirits. But after he has told of their appearing to him, everybody sees them. — Johann Wolfgang von Goethe


Last Friday, I mentioned that I'd gone to summer camp with my family. It's a church camp with a fine arts feel. The topics for discussion were on people who were inspired by God to create something that changed how people think. We had an excellent teacher, Nancy Koester, a religion teacher from Augsburg College in Minneapolis, MN, who loves history. We had an artist who used the above tools to bring stories to life through his painting. He is a science teacher turned pastor turned touring artist. (More on him later). We had fine musicians who filled the room with sound and invited everyone in. And, we had a preacher who had us singing the Psalms and showed us how they hold the messages and healing that get us through the hills and valleys of life.

On Monday, Nancy gave us some background on the composer, George Frideric Handel and his famous choral piece The Messiah. He spent much of his early career writing operas. Operas at the time were rowdy events, much like sporting events today. Really. People came and booed and cheered and jeered. So, when Handel wrote The Messiah, people didn't know what to make of it. Where should it be performed, they wondered? It's too much like opera to be performed in a church. It's themes are too spiritual and sacred to be performed in an opera house. He was rejected and criticized and pushed away. At one point in his life he was so poor, he nearly ended up in debtor's prison. And, now, you can hear parts of The Messiah in many types of churches, colleges, community choirs, and even on Youtube. This is where the Halleluiah Chorus comes from. (Comment below or on facebook if you've ever sung any part of this piece.)

On Tuesday, Paul Oman painted a murial while we watched and listened to a recording of The Messiah.


He preps the canvas the day before he paints for an audience.


Each brush stroke reveals the image he has of the story.


Watching Paul paint is like reading a story.
Each line and color adds more details.
I find myself trying to predict what he will make from certain parts of the painting. The "board" sticking out on the left seemed out of place, at first.


He puts his canvas on a rotating easel.
He paints upside down and sideways, getting the best angle, fascinating us with his perspective, and keeping us guessing as to what will be revealed.


All the while, the mighty chorus is singing some beautiful parts of The Messiah. Paul's brush strokes, at times, moved to the rhythm of the music. As Paul's vision became clearer, the music became more powerful, and we all sat in awe.


The Holy Spirit was shining down on all of us.

I have plans to write an article about Paul Oman's murial ministry, Drawn to the Word. He has painted in nearly every kind of church throughout the United States, and has hopes of going international. He said he can bring any story to life through his art, not just Bible stories. Do any of you know of a good publication for his story?

I'll write more this week on our education and fun at Mount Carmel camp near Alexandria, MN. On Wednesday, we learned about Harriet Beecher Stowe, author of Uncle Tom's Cabin.

Go. Create. Inspire!
Who knows where your inspiration will lead?

Journaling Prompt:  Have you ever felt so inspired to create something that you knew it came from a Higher Power?


Saturday, July 21, 2012

A Midsummer Day's Dream . . . Cream Cheese Nectarine Cake with Crumbly Streusel


Nectarines . . . really fine, really sweet nectarines. Not something one can necessarily count on finding here in Michigan. Usually, though, that doesn't matter. Why? Because typically, in mid-July, we're wallowing in a surplus of glorious local cherries, baking them into this and stirring them into that, not giving those pretty nectarines from out of state a second thought. But late winter weather played holy havoc with Michigan's cherry orchards this year, leaving us with the most pathetic harvest in decades. Trees that would normally be bending under the weight of crimson fruit look instead as if they've been ever so lightly dotted with red.  Just a cherry here, a cherry there. Sorry, folks--forget about "pickin' your own" and keep your fingers crossed for next year.


No home-grown cherries? For born and bred Michiganders that scenario is virtually unheard of. So, nothing left to do but rev up the contingency plans. Time to focus on nectarines instead, nectarines that hail inevitably from elsewhere. A sobering thought, no doubt. Miraculously, though, they're incredibly sweet and more than up to snuff. I've been shocked by their quality, thus I've been munching them the last few days with an unbridled sense of righteous privilege, like a koala in a eucalyptus tree. Don't try to stop me.


About this recipe . . . 


I adapted this from The Grand Central Baking Book, by Piper Davis and Ellen Jackson (I love this book, by the way, and recommend it). I started with their recipe for a cream cheese apple cake, but made some significant tweaks.

First, I reduced the overall size of the recipe by about one third, from one that would produce a large 12" bundt cake down to a reasonably sized 9" round cake made in springform pan. I used a relatively small amount of chopped ripe nectarines, unpeeled, in the batter versus a sizable portion of peeled apples. I added in a modest amount of almond flour/meal (if you can't find it in your usual grocery store, check at Trader Joe's, Whole Foods, or health food stores), which lends a subtle richness to the texture without adding any overt almond flavor. I upped the amount of vanilla, in fact using vanilla bean paste instead of extract, and I also fiddled with the proportion of cinnamon. 


The addition of a streusel topping worked out well, too; I just threw together flour, sugar, almond flour/meal, cold butter, and a pinch of fine sea salt and went at it with a pastry blender. You can count on a cake that happily straddles the fence between a coffee cake and a not-too-dense pound cake. A great cake overall, even without our beloved Michigan cherries.


Cream Cheese Nectarine Cake with Crumbly Streusel


(For a printable version of this recipe, click here!)

Yield: About 16 slices

For the cake:
2 and 1/2 cups unbleached all-purpose flour
1/2 cup almond flour/meal
1 teaspoon baking powder
2/3 teaspoon coarse kosher salt
1/2 teaspoon ground cinnamon
2/3 cup unsalted butter, softened (that's one stick and about 2.5 tablespoons)
8 oz. cream cheese
2 cups granulated sugar
3 large eggs, room temperature
1 and 1/2 teaspoons vanilla bean paste (or vanilla extract)
1 extra-large ripe nectarine, unpeeled, pitted, and chopped into very small pieces

For the streusel:
1/3 cup granulated sugar
1/2 cup almond meal/flour
1/4 cup unbleached all-purpose flour
5 tablespoons of cold, unsalted butter, cut into small chunks
1 pinch fine-grain sea salt

Preheat your oven to 350 degrees. Grease and flour a 9" springform pan.

Make the streusel first:

In a medium bowl, whisk together the sugar, almond meal/flour, and all purpose flour. Toss in the butter chunks and combine with a pastry blender or a fork until most of the mixture is in pieces approximately the size of a large pea. Cover the bowl and put it in the fridge.

To make the cake batter:

In a medium bowl, lightly whisk together the flour, almond flour/meal, baking powder, salt, and cinnamon. Set aside.

In the large bowl of your mixer, using the paddle attachment on medium-high speed, beat together the butter, cream cheese, and sugar until the mixture is fluffy and light in color (beat for at least five minutes and as long as eight). On low speed, add in all of the vanilla, and add the eggs one at a time, beating well after each one. Stop and scrape the bowl and paddle periodically.

Still on low speed, add in all of the nectarine pieces, beating just for a few seconds to combine, then add in all of the dry ingredients. Mix only until the flour looks completely incorporated. Scrape all the batter into your greased and floured cake pan. Sprinkle all of the streusel evenly over the top.

Bake the cake on the middle rack of the oven for about 55-65 minutes. You'll know it's done when the top is lightly golden, the sides are just beginning to pull away from the pan, the top of the cake doesn't jiggle at all when you move it, and a toothpick inserted in the center come out mostly dry. Check your cake after about 40 minutes and if it appears to be browning too fast, lay a piece of foil loosely over the top. Let the finished cake cool in its pan on a rack for at least 15 minutes, then run a thin knife around the sides, remove the springform carefully, and let the cake finish cooling on the rack.


(If you'd like to comment on this post, or to read any existing comments, please click on the purple COMMENTS below.)

Friday, July 20, 2012

The Plays the Thing

Quote of the Day:  Even if it doesn't work out, I will still act because I absolutely love it! Caleb Christiansen on his dreams of making a living as an actor. He is playing Eugene in our local production of Brighton Beach Memoirs by Neil Simon at the Central Lakes College here in Brainerd, MN. You can read my review of the show on my blogspot at The Brainerd Dispatch website.

Caleb as Eugene
Photo by Kelly Humphrey from The Brainerd Dispatch


What I love (and loathe) about community theatre is that the actors are in the show for the love of the art. They do it because they enjoy performing and bringing a story to life on stage. None of them ever get paid. In fact, they pay to be there with their time, transportation costs, grabbing some fast food on their way to rehearsals after working a full day at another job, or taking care of family. What they might lack in polish and pacing, they make up for in passion. These actors would rather spend their evenings in a dark theatre than out on a lake in our beautiful lakes country because they are filled up by this art form.

When I attend a local production, I am observing from many angles. I'm there as a reviewer, looking for the elements of the play that I want to highlight for potential audience. I'm listening for the lines that stand out from the show, the ones that are memorable and illustrate the themes. I'm also there as a playwright and director. Who up there is inspiring me to write? Who would make a good character in one of my plays? What do I want to write that would showcase their talents? Who looks like they'd be fun to work with? And, I'm there as an actor and audience member. I know I've connected with a play when I start to imagine myself in one (or more) of the roles. I am aware of my own emotional responses. What made me laugh? What made me cry? What gave me those feelings of dread, angst, worry, or love?

What gives me the most joy about attending live performances is seeing all the other people who came out for the show. They also left the comfort of their air-conditioned home, or the beauty of the lakes country to sit in a dark theatre and watch their neighbors bring a show to life. For $6.50 that's cheap entertainment, and sometimes the college offers $1.00 night. What does that even pay for? The cost of printing the program?  Maybe they could put out a tip jar for starving actors?

Now, the choice for my Favorite Photo Friday:

Mary and the Boys at Summer Camp

I had a great week at summer camp with my four sons. It's a church camp with a fine arts feel (for our week anyway) and a great place to spend time with family. We had grandpas, grandmas, aunts, uncles, cousins, and friends (old & new). I'll write more about it next week.

Go. Create. Inspire!
And, support your local artists. Maybe even take one out to lunch. (Thanks, JeMA, for lunch yesterday.)

Journaling Prompt:  Why do artists give away their time and talents for free? How can we better support our local artists?