Thursday, June 28, 2012

Families that Separate and Reunite

Quote of the Day:  You can kiss your family and friends good-bye and put miles between you, but at the same time you carry them with you in your heart, your mind, your stomach, because you do not just live in a world but a world lives in you. -Frederick Buechner

If you don’t recount your family history, it will be lost. Honor your own stories and tell them too. The tales may not seem very important, but they are what binds families and makes each of us who we are.  -Madeleine Engle

How will our children know who they are if they do not know where they came from. unknown

I wish I could relate to the people I’m related to. -Jeff Foxworthy
These great quotes and more on family and reunions can be found on the Family Reunion Blog.


Last weekend, the Aalgaard's had a family reunion. It's Thursday afternoon, and I'm just now finding the mental space to reflect and write about it. Relatives arrived on the family farm from various places in Minnesota, Oregon, Wyoming, Canada, and Norway. All winter, we sounded the call "The Norwegians are coming!"

In the year 1921, my grandpa Arne Aalgaard got on a ship and sailed to the New World. His siblings scattered far and wide. A few remained in Norway. One went to Canada, and a couple more ended up in other parts of the U.S.A. One brother died in China when he was there as a missionary. They stayed connected through letters and other correspondence and visits to each other if they could. I know that my grandpa traveled back to the homeland whenever he could. My brother wrote about this on his blog, Wandering Norwegian, a couple years ago as he was renewing connections.


Three generations of cousins


Not everyone could make it to this reunion.
We represent the various generations.


Reunions may not be the most exciting things for kids. They played some games, ate tons of food, got a glimpse of where they came from, and if they were listening at all, heard a few family stories.

No matter how far and wide you roam, you are still part of a family whose stories are your stories, whose blood runs through your veins along with their hopes, dreams, desires, and hardships.

Go. Create. Inspire!

Journaling Prompt:  Ask a living relative to tell you his or her story and write it down.


Eggplant Caponata

2 MEDIUM SIZED EGGPLANTS/ PEELED AND SLICED THIN, SALT, PEPPERED, AND BRUSHED WITH OLIVE OIL, LAY IN A BAKING PAN
1 CUP DICED TOMATOES and their juice
2 CLOVES GARLIC
2 TABLESPOONS SALTY CAPERS
3 TABLESPOONS OLIVE OIL
1 CAN OF PITTED BLACK OLIVES
1 CUP OF WHITE WINE
Preheat your oven to 400.  Prepare your eggplants.  Rinse, peel away the skin and slice.  Lay in a pan.  Brush with olive oil.  Salt and pepper them . Bake for 20 minutes, until soft.  You will begin to smell the eggplants. Do not get them to large or they will be seedy.   Remove from oven and let cool.  Heat your olive oil.  Saute your garlic until fragrant.  You may use red onion if you prefer.  When fragrant, add your olives cut up and your capers.  Smash them down some with the back of your spoon.    Add your eggplant and mix.   Mix in your tomatoes.  Add your white wine and let reduce by half.  Keep mixing and reducing  until oil seperates from the pan.   This should only take about 20 minutes in all.  Salt and pepper to taste.    At this point, set aside.   Heat your bread in the oven.  Slice, spoon your fragrant Caponata  over your bread.  Garnish with parsley and basil if you like.  The 20 minute Appetizer.  What more can you ask for?
This wonderful Caponata is so versitile you can use the left overs for Pasta Sauce~ 2 meals in one!~ Enjoy and Buon Appetito.

Monday, June 25, 2012

Salted Brown Butter Crispy Treats

Secret Recipe Club


Yes, it is time for another Secret Recipe Club reveal.  I can't believe how little I have been cooking or trying new recipes.  I am happy to report that school was released a few weeks ago, so my days of not cooking much are gone, at least for the summer.  I will be preparing many more new recipes for my family and everyone that reads my blog starting with the June Secret Recipe Club.

For those that aren't familiar with it, the Secret Recipe Club, is a once a month opportunity to secretly try a new recipe from another blogger's site and write about it.  Everyone does a reveal on the same day at the same time.  During my last term of school it was the only time I tried new recipes because it was all I had time for.

This month I am assigned to Shockingly Delicious.  Oh. My. Goodness.  This drool worthy blog is written by Dorothy Reinhold who is newspaper editor, writer, mom, food lover, and volunteer.  Just reading her blog made me hungry, and I was challenged to choose only one recipe to highlight.  She highlights recipes that are familiar yet unique, like Avocado ice cream, and Mediterranean Deviled Eggs. After drooling over this delicious dressing for a summer salad, her 22 pie recipes, and her many meatless dishes, I finally settled on Salted Brown Butter Crispy Treats.

These little dessert bars are reminiscent of my adult childhood favorite gooey snack. Dorothy has many variations of this traditional recipe on her blog, but I chose this one because it was different than any other version I have seen.  Because I was out of chocolate chips, used pieces of a chocolate bar; however, I didn't feel the need to change or alter anything else about Dorothy's original recipe.  They are bites of soft, gooey, sweet, and salty heaven.  Browning the butter adds a rich nutty flavor that can't be beat for a grown up treat.  Dorothy calls them, "scary good," and I couldn't agree more.  ENJOY!


Salted Brown Butter Crispy Treats
Recipe Source: Shockingly Delicious adapted from Smitten Kitchen


4 ounces (1 stick) unsalted butter
Heaping 1/4 teaspoon coarse sea salt
1 (10-ounce) bag marshmallows
6 cups Rice Krispies cereal
Garnish: chocolate chips equal to the number of pieces you are cutting (A Cook's Quest used a chocolate bar instead)


Lightly grease an 8-inch square pan with butter or a non cook spray. Set aside.
In a  heavy pan melt the butter over medium heat allowing it begin to brown. As the butter begins to change color, add the salt and stir frequently, making sure to scrape small brown parts from the bottom of your pan. Don’t leave your stove now, this step requires attention or you will end up with burned butter which is not good at all. 
As soon as the butter is the nutty brown color, turn the heat off and stir in the marshmallows.  Stir until the marshmallow is completely melted and glossy. 
Stir the Rice Krispies cereal into the melted marshmallow and butter mixture. Using your greased hand, or any other handy kitchen gadget, press the delicious mixture into the prepared pan. Press the chocolate chips point down into the warm mixture using as many as you need to have one chip per serving.
Cool completely and cut between chips into squares.

Another variation recommended by Dorothy is to omit the chocolate chips and add 2 teaspoons of chopped fresh rosemary.  Yum!


Sunday, June 24, 2012

Baked Pasta with Sausage and Mozzarella (Pasta al Forno version 2).


I never imagined years ago that I would ever see the day that my son  ( who is now 12), would ask for something other than pizza.  A fussy eater early on, and plagued with diet restrictions,  there was nothing I could do to get him to eat.  The best advice I have ever had in my life came from a Pediatrician in Italy who said, "Have you ever seen a nine year old eating Baby food?"  I must admit,  I was puzzled at the moment.  Seemed a simple answer to a daily fight with one stubborn Italian boy.  One day, around the age of Nine he came flying down staircase, running into the kitchen trying to  figure out where that wonderful smell of sausage was coming from. He came around.  He said those words I will never forget and I waited so long to hear, "Mom, that smells delicious, can you make me some Pasta?"  Much to my initial shock, I just couldn't hold myself up.  Had to sit down and contemplate what had just happened.  After years, of constant arguing over food, it had all come to an end.  So I did what any person would do, I made pasta and never looked back.  This is Max's favorite.  I hope it's yours too.
Buon Appetito!
For the sauce.
2 cloves of garlic diced
3 tablespoons olive oil plus one tablespoon vegetable oil
12 oz of ground sausage (without casing/ chopped)
2 teaspoons of salt
one teaspoon of black pepper
One cup of white wine
14 oz can of diced tomato's
one cup of water
One teaspoon of salt (If you are using unsalted tomato's for your sauce)

In a saute pan large enough to hold your sauce,  heat your olive oil to medium and add your garlic.  When your garlic is fragrant,  add your sausage and brown.   After about 7-10 minutes on medium, your sausage will brown.   When your sausage is browned and about to stick to the bottom of your pan, add you white wine (one cup),  and let boil away.   This will take a few minutes until your liquid is all evaporated.  At this point add a 14oz can of diced tomato's, one cup of water, salt, pepper,  and let cook for approximately 15 minutes on medium low.  Mix while cooking and your liquid will evaporate by half.  At this point your pan should have a ring of oil around your sauce.  This indicates your sauce is ready!  In a separate pasta Pot, add your water and let boil.  Add your pasta and cook for approximately 6 minutes.  It is very important to under cook your pasta.  It will continue to cook while in the oven, so don't worry.
For the Baked Pasta:
8oz of fresh mozzarella chopped up
12 oz of Rigatoni Pasta
Salt for the pasta water
1 cup of Parmigiano Reggiano cheese

Cook your pasta until Al dente.  Toss with 1/2 the sauce and pour into a baking dish. Add 1/2 your Parmigiano Cheese.  Add the rest of your Pasta.  Add your Mozzarella cheese across the top.  Add additional sauce if you like.  Add the rest of your Parmigiano Reggiano.  Cover securely and bake in a 375 degree oven for 30 minutes.  Uncover and cook for 5 minutes more. 
Serve in deep Pasta Bowls.  Get ready for seconds!  Buon Appetito!

Saturday, June 23, 2012

Homemade Hamburger Buns: As the Suit Makes the Man, so the Bun Makes the Burger


It's hard to predict what Andy, my husband, will say he feels like having for dinner on any given occasion, mostly because he's so flexible and cooperative where culinary pursuits are involved. He  rarely backs away from any dish he's presented with. So, last weekend, I don't know whether I was surprised or nonplussed by the fact that he requested nothing more exotic than hamburgers for his Father's Day dinner. After he told me that, though, I immediately understood that he was hatching a plan; there had to be something unique about those burgers.

 
Turned out I was right. The burgers would be painstakingly prepared from an interesting mixture of three cuts of beef--brisket, chuck, and beef short ribs--making homemade buns a natural requirement. Andy carefully selected the meat himself from a butcher the day before it was to be cooked. He took it right home, sharpened his chef's knife, and with surgical precision trimmed just the right amount of the fat, cut the meat into chunks, and then semi-froze them. Once the pieces were firm but not rock solid, he ground them using the meat-grinding attachment that hooks onto my beloved red mixer (oh yes, he sanitized my baby thoroughly when he was done). No herbs, spices, or flavorings were added, mind you--not even salt or pepper. Just the unadorned, unadulterated meat. 

 
On Father's Day, he grilled those burgers for us with the utmost care, and they were a sight to behold. Now, I'm not exactly a diehard fan of any kind of meat. In fact, I don't think it would be hyperbole for me to say I am often indifferent to it. You'll never catch me prowling through meat-centric blogs or waxing rhapsodic about the delicious bone marrow I sampled at a fancy restaurant (involuntary shudder), that's for sure. But, give me a well assembled, expertly grilled hamburger made from sensational stuff and you'll get a noticeable reaction out of me. Maybe even a deeply sincere, "Yummmmm."

Anyway, we placed those hot, glistening patties tenderly atop the classic hamburger buns that I'd baked fresh the same day and, served with coleslaw, a few crunchy chips, and rosy-red watermelon slices, it all made for a fine and unfussy Father's Day supper, I must say. (Gosh. Maybe I actually like meat more than I thought?)

 
About this recipe . . . 

You might say this burger bun recipe came to me, typed on an old index card, from my late mom (that would be Stella, 1927-2006; honestly, that woman just baked non-stop). Her little handwritten note on the back indicates she first found it in a 1955 Better Homes and Gardens pamphlet called "America's Best Homemade Pies, Cakes and Breads." Her recipe as written would have produced enough for a starving battalion so I reduced the yield down to one dozen standard-size buns, and I fiddled with the method just a tiny bit. 

 
This is a nice, soft, all-purpose burger/sandwich bun with a slightly detectable sweetness, a smooth crumb, and it's sturdy enough to perform its duty admirably. It won't fall apart even if you stack your juicy burger with loads of condiments. These freeze well, too.

Classic Homemade Hamburger Buns
(For a printable version of this recipe, click here!)

Ingredients:
4 cups unbleached all-purpose flour, lightly whisked or sifted after measuring
2 and 1/4 teaspoons instant yeast (no need to proof instant yeast)
1 cup warm water
3 oz. vegetable oil
1/4 cup granulated sugar
1/2 tablespoon coarse kosher salt
2 medium size eggs, lightly beaten (or 1 and 1/2 large eggs)

2 tablespoons melted butter, to brush atop unbaked buns

In the large bowl of your mixer, using the paddle attachment, combine two cups of the flour and yeast on low speed for several seconds. In a medium bowl, by hand, stir together the warm water, oil, eggs, sugar, and salt. Add this into the mixer bowl. Beat on low speed for about 30 seconds; stop and scrape the bowl and beaters, then increase the speed to medium and beat for 3 more minutes, again stopping to scrape as needed. 

Remove the mixer bowl from the mixer and stir in the remaining flour by hand. If it's extremely soft and still almost liquidy, add in a little more flour, one tablespoon at a time until it seems more workable. Dump the dough out onto a well floured work surface and knead it until it feels smooth and elastic. 


Put the ball of dough into a large bowl that's been oiled or sprayed with vegetable spray. Turn the dough over so it's completely coated. Cover the bowl with a piece of oiled/sprayed plastic wrap. Cover that with a thin dish towel, and place the bowl in a relatively warm spot. Let the dough rise until it's about doubled, perhaps one hour or so. (This is kind of a rich yeast dough--what with the amount of eggs, oil, and sugar it contains--so don't worry if you don't see a quick dramatic rise the way you probably would with a leaner white bread dough. Rich doughs are more subtle in this respect.)

Cover two half-sheet pans with parchment paper.

Deflate the risen dough on a very lightly floured surface. Divide it into three equal portions using a bench knife, or a very sharp chef's knife. Cut each portion into four pieces. Cover the pieces with a sheet of sprayed plastic wrap and let them rest for about ten minutes. 


Uncover them and shape each one them into a smooth ball by rolling it in a small circular motion on your work surface, held gently beneath your closed fingers and palm. Tightly pinch closed any seam on the bottom. Place six buns on each of the two half-sheet pans. Press them down into 3 and 1/2 inch circles. 


Cover them again with the sprayed plastic wrap and a light dishcloth and put them in a warm spot. Preheat your oven to 375 degrees, and let the buns rise for about half an hour as the oven heats up. 

Just before placing the risen buns into the oven, brush the top of each one with melted, unsalted butter.


The buns will bake quickly. Peek at them after about ten minutes. Take them out when the tops are golden and the bottoms are deeply golden. 


Let them cool completely, on a rack, before slicing them for burgers. 


(If you'd like to comment on this post, or to read any existing comments, please click on the purple COMMENTS below.)

Friday, June 22, 2012

Review of Anytown at the Guthrie

Quote of the Day:  The song changes over time. It changes depending on who you're singing it to. The song changes. This is one of the quotes that flashed on the backdrop as the dancers were performing Anytown at the Guthrie, running through Sunday, June 24. I wish they had printed the quotes in the program along with descriptions of the songs and what the dancers were trying to tell us through their movements. Go to The Guthrie multimedia page for a rehearsal video clip.

The Guthrie Theater presents a Shapiro & Smith Dance production of Anytown, Thursday, June 21 - Sunday, June 24. Pictured: Kari Mosel and company. Photo credit: V. Paul Virtucio

Anytown is a dance performance by the Shapiro & Smith Dance Company using the music of Bruce Springsteen and E Street Band members Patti Scialfa and Soozie Tyrell. It tells stories of American life, the working class, the hardships, the relationships, the emotions of a lifetime.

The Guthrie Theater presents a Shapiro & Smith Dance production of Anytown, Thursday, June 21 - Sunday, June 24. Pictured: Kari Mosel and company. Photo credit: V. Paul Virtucio

Some images were clear to me. I felt the need and longing from Human Touch (opening number), the family conflict in Square Dance, the turmoil and conflicting emotions of When You're Young in the City, and the sexual tension in The Big Muddy. Other images and movements went right past me, I'm sure. I regretted not having a background in dance - for my lack of interpretation skills, as well as an envy of the dancers. They are beautiful and athletic. They look strong and powerful out there, so confident. I can't take my eyes off of them and wonder how many hours of training it must take to be so skilled and poised for an entire show like this.

The Guthrie Theater presents a Shapiro & Smith Dance production of Anytown, Thursday, June 21 - Sunday, June 24. Pictured: Maggie Bergeron and company. Photo credit: V. Paul Virtucio

I loved the staging of Maria's Bed, with the company sitting all proper like they're in church, sweet costumes, hats, jazzy movements, and the dancer in the back on the bed and moved towards the front, like we're one way in public and another in private.

My favorite number was St. Genevieve because it is about a river, how it flows and floods, and like life, you can't really move away from it. The choreography truly looked like a flowing river. And, the final numbers with Laura Selle Virtucio dancing solo, then the company joining her for Born in the U.S.A. and Glory Days were fantastic.

I know I missed some of the meaning and some of the story, and my techie son admits to not understanding much of it, but I chose to sit back and just watch and feel the emotions that the songs and dancers created. That was worth the drive to the cities from my home in Brainerd on a gorgeous summer night. As we left the city, just a hint of light was still on the horizon, golden and hopeful, and as we were heading north, flashes of lightning gave us a preview of the Fourth of July.

And, I had one more date with my oldest son, the HS graduate, who will be heading off on his own adventures, soon. He expanded his horizons just a bit more with this trip to the city.


He tried Thai food for the first time at Kindee near the Guthrie.

His was a milder noodle dish.


I had spicy red curry. Hoo! it heated up my mouth, but I cooled it off with that delicious iced coffee.

We both enjoyed the fried calamari, lightly breaded with just the right amount of spice in the dipping sauce.
(Thanks to our waitress Michelle for the great recommendations.)

Dare to expand your horizons. There is so much of life to taste and see.

Go. Create. Inspire!

Journaling Prompt:  Go out and try something new, a food, an artform, or even a drive down a new road. What have you discovered?


Thursday, June 21, 2012

Artist Date Roman Holiday Style

Quote of the Day:  It is not how much we have, but how much we enjoy, that makes happiness. ~ Charles H. Spurgeon


Whenever I'm invited to view and review a show at The Guthrie, I try to think of one new thing I can do when I go to the city. Sometimes, my guest is someone who is attending a show here for the first time. I love watching them experience something new. My publicist/friend Krista has accompanied me the most, so we try to plan something new to do, like eat some place new, or walk around somewhere. We didn't get there early enough for the Stone Arch Festival, but we did  have time for a delicious Greek Salad at the Spoon River restaurant, right outside the Guthrie. They're all about fresh, local ingredients, food that makes you feel good.


You know I love taking pictures of scrumptuous food like this. Plus, I just got a new lens for my Nikon camera. So, Krista and I had fun taking photos here, and again after the show down by the river. Because we were having so much fun with our cameras and our dining experience, we met these two lovely ladies.

Bernie and Chris


We exchanged cards. Chris is a writer, too.
They were going to see Amen Corner.
I invited them to read my reviews on this blog.


They asked Krista to take their picture.


Bernie took one of us.


Then, we all went in to see our shows.


You can read my review by clicking on The Guthrie tab above.


After the show, we went out of the theatre to take a walk and shoot some photos by the river, and discovered this cute motorbike that reminded us of the scene from Roman Holiday.

Just a fun shot using reflection.

One for the website whenever I get that up and going.
Plus, wanted to show off the outfit I found at a local Brainerd shop, The Olde Open Window.

I found the most awesome sandals there. Just like Princess Anne in Roman Holiday, they set my soul (soles) free and I was off on another Artist Date in the MinnieApple.

You can have an Artist Date wherever you go, or even if you stay at home. Do something new. Find a hot, new pair of shoes and a new place to where them. Invite a friend along, and don't be afraid to talk to strangers, at least not the ones who smile and say, "Hi." Life is an adventure...
Go. Create. Inspire!

Journaling Prompt:  Where have your soles (or souls) taken you lately?


Monday, June 18, 2012

Review of Roman Holiday at the Guthrie

Quote of the Day:  I want to live each day like it's a grand adventure. Princess Anne in Roman Holiday, playing through August 19, at the Guthrie Theater in Minneapolis.

Princess Anne is the poor, pretty princess whose life is all schedule and obligation and no room for fun. She's on a tour of Europe where she's told where to go, whom she shall meet, what to wear, and how to dress. She looks out the window at the bustling city and hears the songs of real people living, dreaming, and falling in love. Princess Anne doesn't want to experience Rome as untouchable royalty. She wants to be a real girl. So, she slips out in the dark of night, changes her clothes, enters a nightclub and gets carried away by a handsome musician looking for a story.


You'd be so easy to love.


She traded her perfect princess heels for a sassy new pair of sandals, and her soul (or soles) was ready for adventure. Once he got her on the back of the motorbike, I knew she was a goner.


She meets real life people who sing, dance, flirt, and swing their hips. The voluptuous Francesca, played by Christina Baldwin, steals the show in her fabulous costumes, showgirl numbers, and command of the men (and stage). She warns "Anya" that Most Gentlemen Don't Like Love.


When you've embarked on a Roman(tic) Holiday, warnings be damned. The city of love with it's sites and sounds, and wishes in the fountain, shows no mercy even on an unlikely pair such as these. I believe I heard a collective sigh from the audience as Joe plucked out the notes to Night and Day and sang of his devotion to a princess who dropped into his life for one glorious day.

I am amazed, once again, at the Guthrie's talented costumers, choreographers, set designers, and performers. Roman Holiday has a huge cast with many big numbers, good old-fashioned musical theatre that sets your toe tapping and provides stunning visual images. The dancers have some fun comic scenes and gorgeous moves.

Roman Holiday is an excellent summer show. Grab your girl, or guy, jump on your bike, and ride on down to the Guthrie to experience the songs of Cole Porter, the images of Rome, and the thrill of a live performance.

Go. Create. Inspire!

Journaling Prompt:  Where would you go for a romantic get away?

Edward Watts (Joe Bradley) and Stephanie Rothenberg (Princess Anne) in the Guthrie Theater's production of ROMAN HOLIDAY, book by Paul Blake, music and lyrics by Cole Porter. Directed by John Miller-Stephany, set design by Todd Rosenthal, costume design by Mathew J. LeFebvre and lighting design by Donald Holder. June 9, 2012 - August 19, 2012 on the McGuire Proscenium Stage at the Guthrie Theater, Minneapolis. Photos by Michael Brosilow


Layered Apricot Bars . . . and Going with the Flow


Well, I feel like it's officially summer now. The weather's been astoundingly pleasant. Robins and sparrows convene daily for a splash in our bird bath. Jittery black squirrels, which seem to have multiplied overnight, dash in circles around our backyard every morning, just like little kids.

 On the human front, my younger son finished his sophomore year of high school last week and my older son is finally back home after a challenging freshman year in college; their relief is palpable.

My husband, who likes to paint in his precious spare time, has lately been setting up his easel in the backyard. He looks so calm and content with a paintbrush in his hand.


This kind of thing, taken in total, gives me a quiet sense of confirmation that, for the moment at least, all is perfectly well in our little nest. However fragile, however fleeting, these delicate moments of complete satisfaction with life are what it's all about. Maybe it's a mom thing. Or maybe not . . . do you find that to be true as well?


And despite the increasingly warm weather, I find myself in the last week or so more interested than ever in baking. It's like something about the four of us being all together again has suddenly caused my nesting instincts to ramp up, so I figure I'm just going to go with the flow.

Gonna bake whenever the spirit moves me, and if I want to bake something odd or old-fashioned or outrageous or boring, well, that's all fine. This summer, as a baker, I think I'm just gonna let my freak flag fly.

 About this recipe . . .

Adapted from this Hungarian apricot bar recipe on 
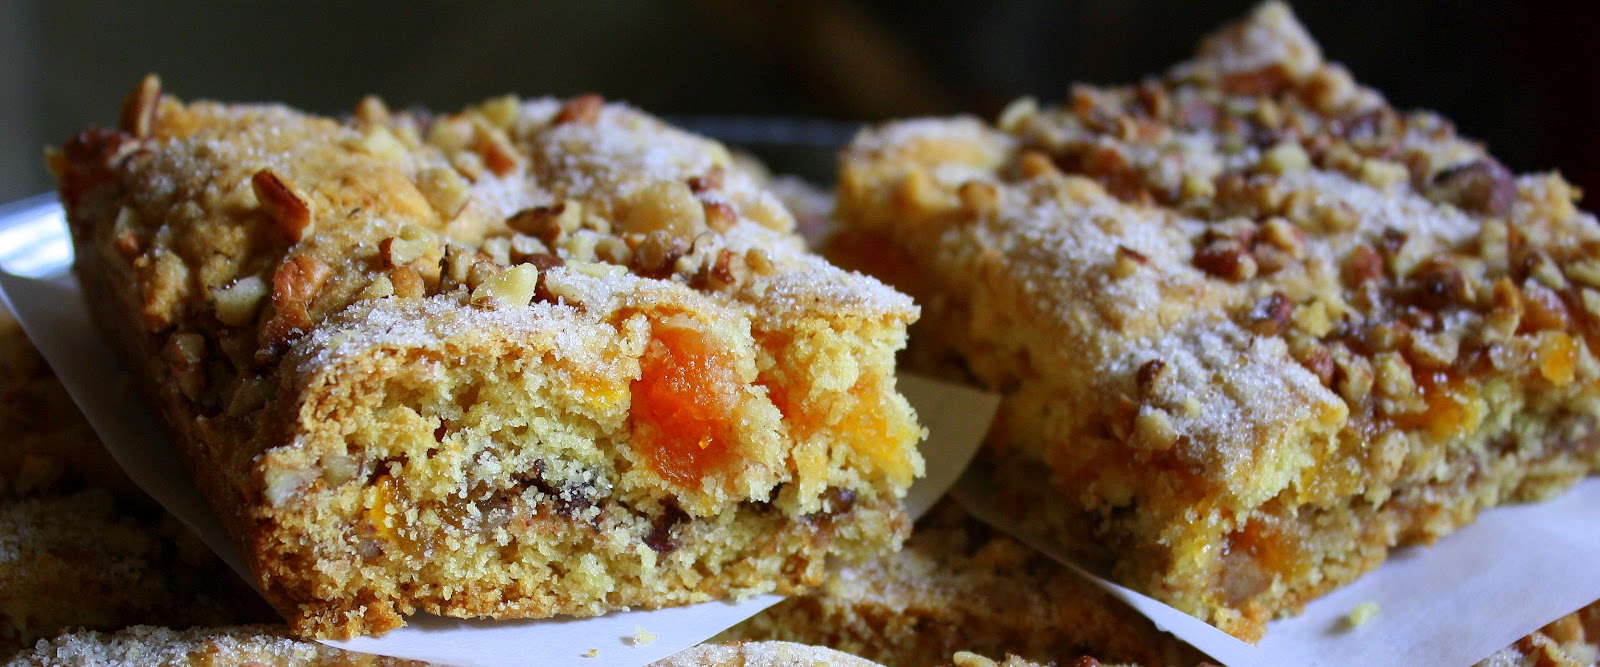
Chowhound, this makes a big, big pan of bars! I added candied ginger and ground cinnamon, used toasted pecans instead of walnuts, and fiddled with the method somewhat. I also added a little lemon juice and sugar into the apricot filling formula. This recipe is kind of labor intensive for a bar, what with the rolling out of the three soft dough layers, but I thought it was worth the time and effort.

Layered Apricot Bars with Candied Ginger
(For a printable version of this recipe, click here!)

Yield: 1 half-sheet pan (18" x 13") lined with parchment paper cut to fit the bottom of the pan without extending up the sides

Ingredients for the apricot filling:
12 oz. dried apricots, chopped small
12 oz. good quality apricot preserves
1 cup water
1 tablespoon granulated sugar
1 tablespoon fresh-squeezed lemon juice

Ingredients for the dough:
5 cups unbleached all-purpose flour
1 cup granulated sugar
1 tablespoon and 1 teaspoon baking powder
2 teaspoons baking soda
1 teaspoon coarse kosher salt

8 oz. unsalted butter, softened but not warm
3 tablespoons vegetable shortening
Yolks of 4 large eggs
1 cup thick sour cream
1 teaspoon vanilla extract or vanilla bean paste


Ingredients for the mixture of sugar and nuts:

1 and 3/4 cups toasted pecans, chopped small
1/2 cup granulated sugar
1 tablespoon finely chopped candied ginger
1/4 teaspoon ground cinnamon

Make the apricot filling first:
Simmer all of the filling ingredients together in a medium size saucepan until thick and bubbly. Keep the fire medium-low so it doesn't burn, and stir the contents frequently. Set aside to cool.


Prepare the sugar and nut mixture next.

In a small bowl, stir together all ingredients for the sugar and nut mixture; set aside.

Make the dough:
In a large bowl, whisk together the flour, sugar, baking powder, baking soda, and salt.

In the large bowl of your mixer, on low speed, mix together the butter, shortening, egg yolks, sour cream, and vanilla until well combined. Add all of this into the bowl of dry ingredients and stir it in. Divide the dough into equal thirds. Wrap each piece in plastic wrap and chill it in the fridge for about 20 minutes.


Preheat your oven to 350 degrees.

Take one piece of dough from the fridge and roll it out onto the parchment paper from your pan. Try to roll the dough as close to the edges of the pan as you can. Use flour on your rolling pin and sprinkle it lightly on the dough as needed. The dough may be quite soft and sticky.

After the dough is rolled out, place it, still on the paper, into the pan. Spread about two thirds of the sugar and nut mixture evenly over the top. Remove another piece of dough from the fridge. Scatter chunks of it on top of the nut layer. Flour your rolling pin again (reflouring it as needed), and roll the chunks of dough out as best you can over that; this layer of dough may look patchy here and there (as shown in the picture below) but that's okay.


Spread all of the apricot filling evenly on top of the layer of dough.


Now, on a well floured piece of parchment, roll out the remaining piece of dough. Make it the same size as the sheet pan; this is the piece you will end up cutting into strips to make the faux-lattice design. Once rolled out, use a pizza/pastry wheel to evenly divide the strips length-wise. Try to make each strip about one inch wide; try to get about 16 strips in all. Carefully lift the strips evenly lay the long ones first atop the apricot layer; use about 6 of them. Cut the remaining strips so they're about 14 inches long, and lay about 10 of them, perpendicular, over the long strips.


Over the top of the lattice, scatter the remainder of the nut and sugar mixture.


Bake the bars for about 30 minutes, until they're nicely golden on top.


Cool them completely on a rack before cutting them and attempting to remove them from the pan. They'll hold up well for a few days, if you keep them covered, before they start to dry out. (Store any leftover bars, as soon as they're cool, well wrapped in the freezer.)


(If you'd like to comment on this post, or to read any existing comments, please click the purple COMMENTS below.)